AI-VMD
Last updated: April 2026
AI-VMD alarm configuration on Genetec Security Center
Scenario:
This scenario provides step-by-step instructions for integrating i-PRO AI Video Motion Detection (AI-VMD) with the Genetec Security Center. By following the detailed instructions in each section, you can ensure the optimal integration of AI-VMD for enhanced security monitoring.
- Camera Settings
1.1 Camera Registration
1.2 Detection Area Settings
1.3 Detailed Settings
1.4 Schedule Settings
1.5 Alarm Notification Settings
1.6 Time Synchronization - Genetec Settings
2.1 Event Notification Settings
2.2 Event-to-action Settings (Optional)
2.2.1 Alarm Notification Settings
2.2.2 Alarm Settings
2.2.3 Action Settings
2.2.4 How to Execute Different Actions Based on Detection Area or Detection Object (Human, Vehicle, Bicycle)
2.2.4.1 Specifying a Detection Area
2.2.4.2 Specifying a Detection Object (Human, Vehicle, Bicycle)
2.3 Recording Settings
2.3.1 Overview: Choosing the Proper Recording Mode
2.3.2 Option A: Event-Based Recording
2.3.3 Option B: Continuous Recording with Event-triggered Enhancements - How It Works
3.1 Checking on the Monitoring Screen
3.2 Checking on the Alarm monitoring Screen - Bounding Box Settings (Optional)
4.1 New Configuration Options in AI-VMD V4.10
4.2 Example of Setting to Hide Bounding Boxes for Stationary Objects
AI-VMD:
The AI-VMD is an AI application that differentiates between vehicles, two-wheeled vehicles, and people. It further detects and sends warning notifications when they enter a specified area. It can also count the number of times the target object crosses a line.
AI-VMD (AI Video Motion Detection) | i-PRO Products
1. Camera Settings
1.1 Camera Registration
Register the camera to VMS.
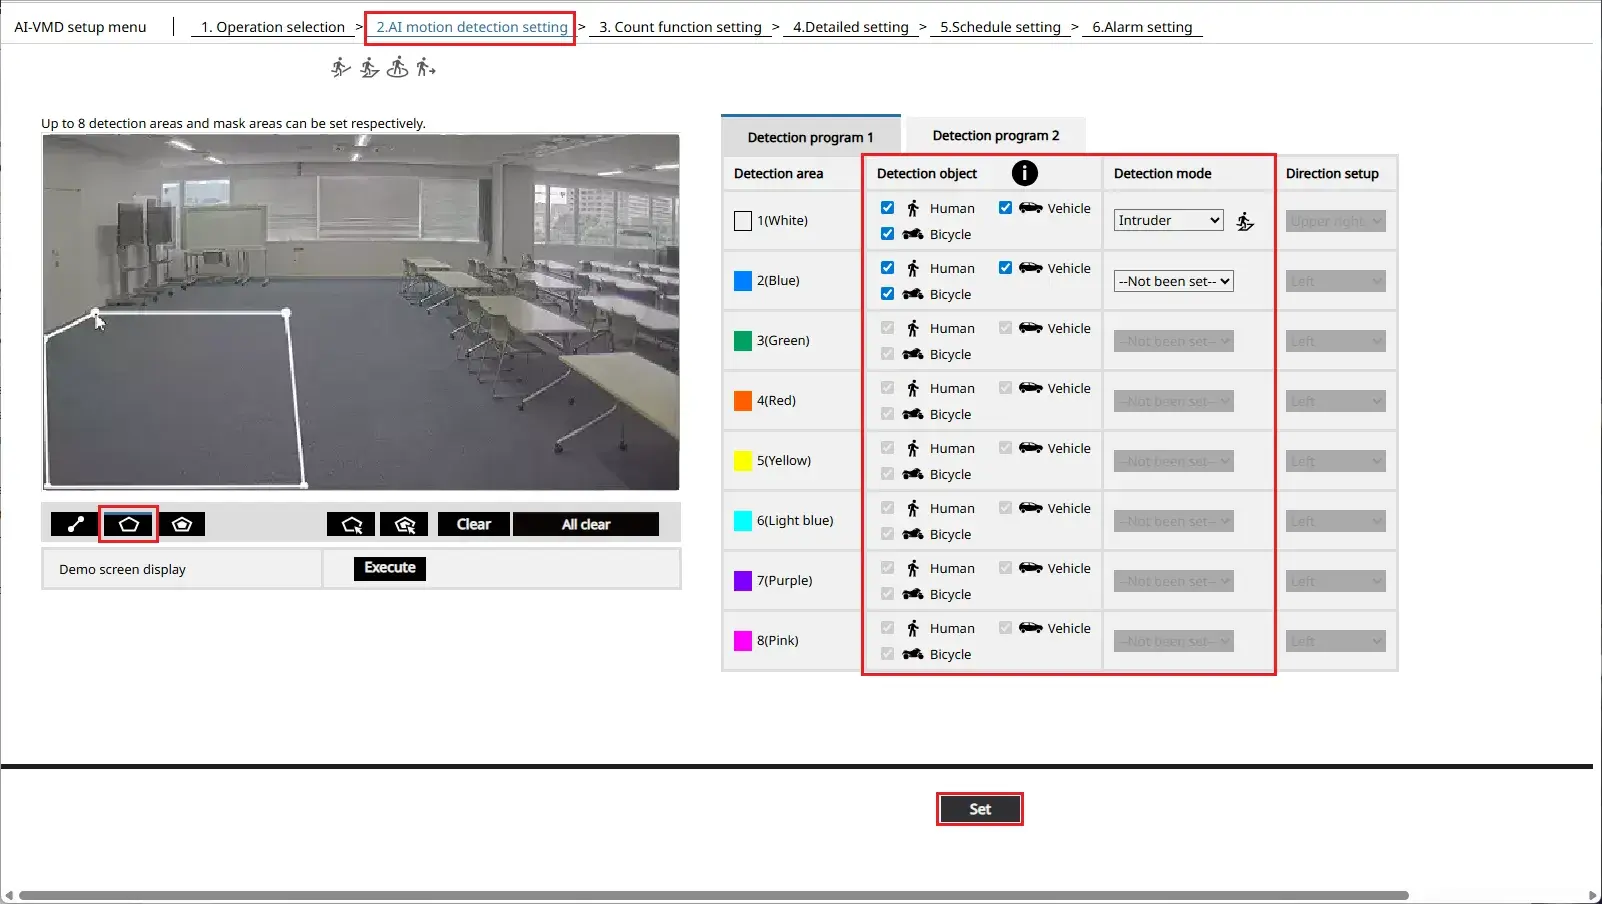
1.2 Detection Area Settings
Set up detection zones and define specific target objects.
1. Go to [Setup] > [Ext. software] > [AI-VMD] > [2.AI motion detection setting].
Specify the area, set the [Detection object] / [Detection mode], and click [Set].
Each Detection area is assigned an area ID based on the color of the [Detection area].
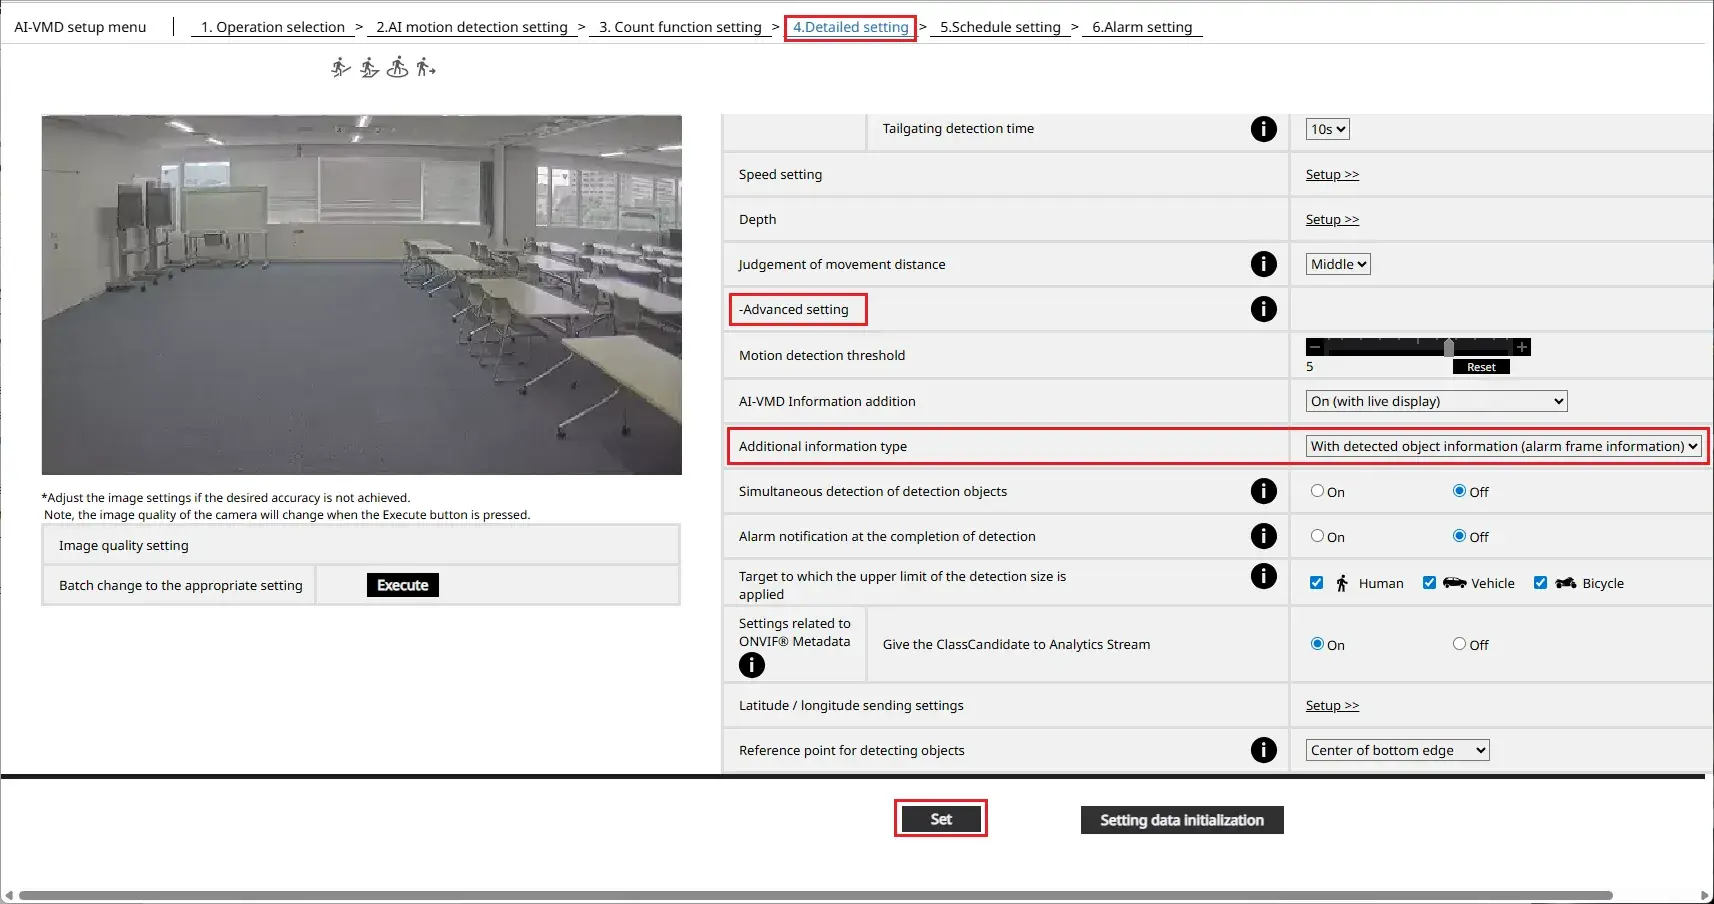
1.3 Detailed Settings
Configure the required option settings, schedule, and alarm notification destination.
1. Go to [4. Detailed setting] > [Advanced setting] and configure the necessary settings.
Note:
If you want to display the details (object type) when receiving alarm notifications on the VMS side, set [Additional Information Type] to [With detected object information (alarm frame information)].
After completing the settings, click [Set].
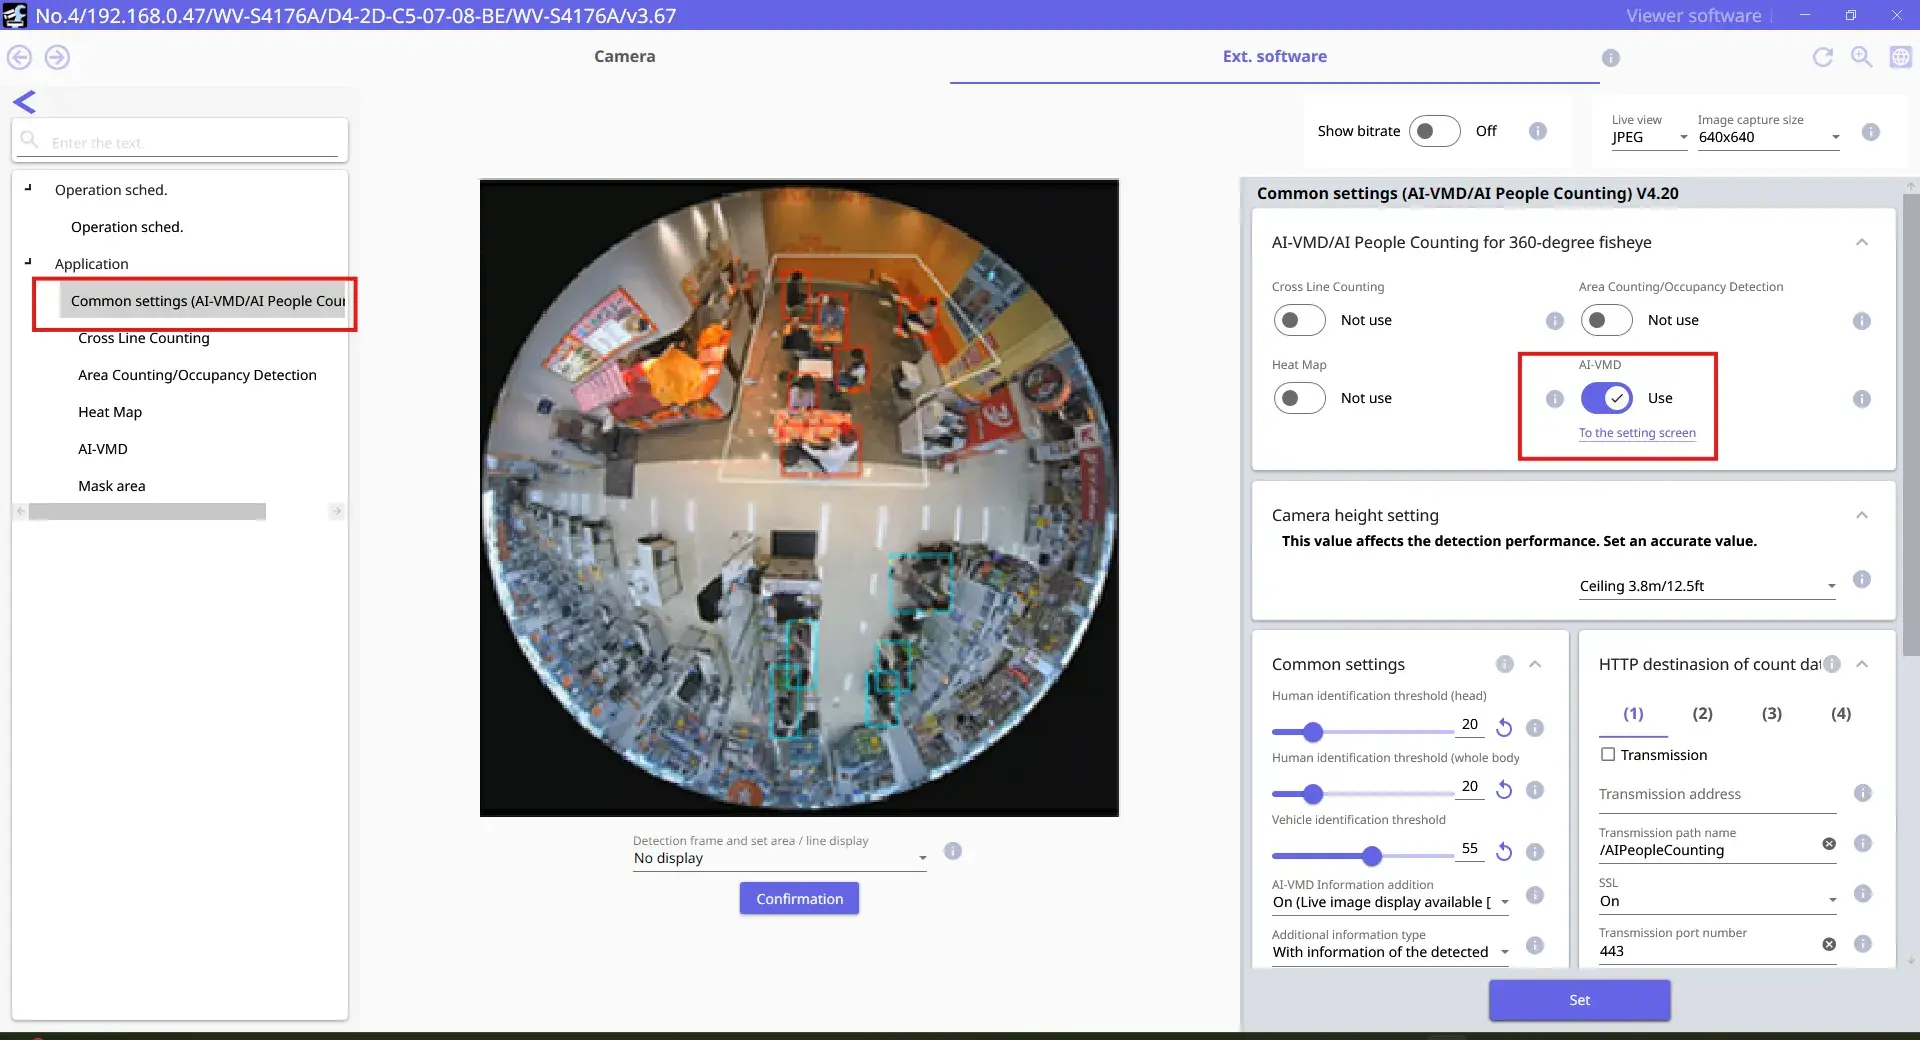
Note:
When using a 360-degree fisheye camera, please check the following settings if the i-PRO Configuration Tool is required.
Go to [Application] > [Common settings (AI-VMD/AI People Counting) Ver.X.XX].
Confirm that [AI-VMD] is set to [Use].
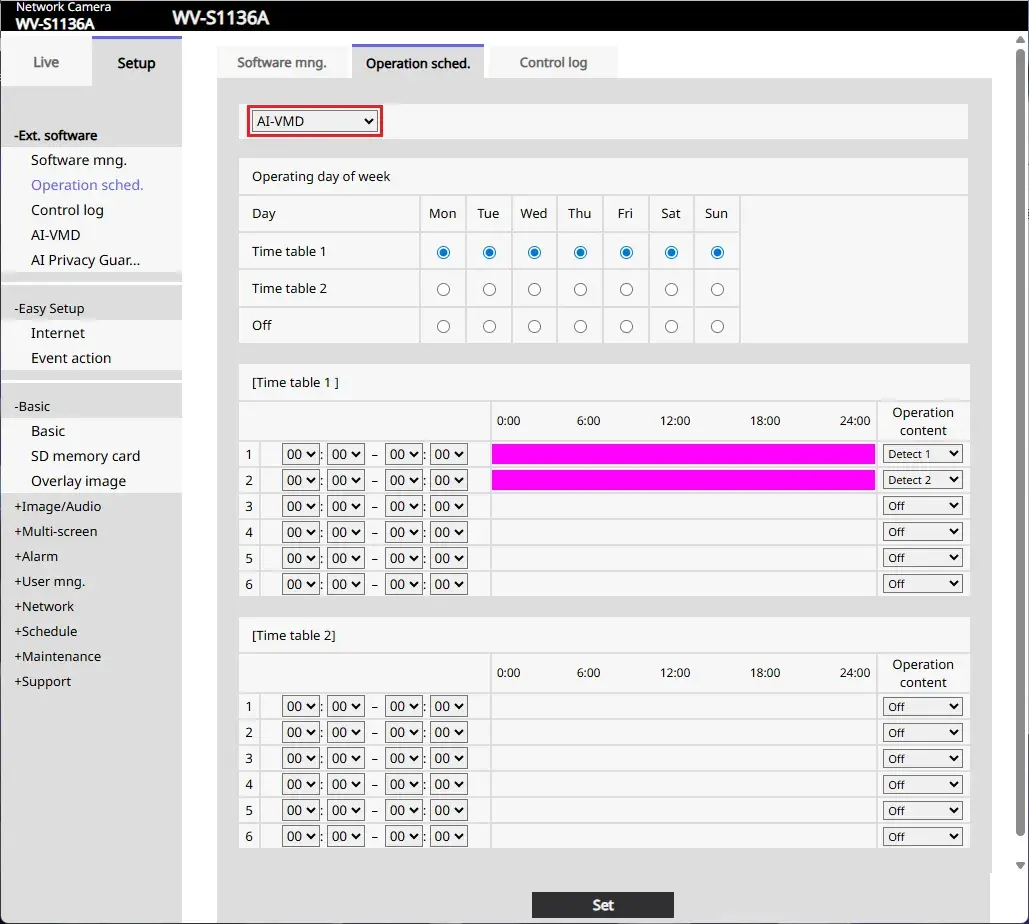
1.4 Schedule Settings
1. Go to [Setup] > [Ext. software] > [Operation sched.].
Select [AI-VMD] and set the schedule to enable detection.
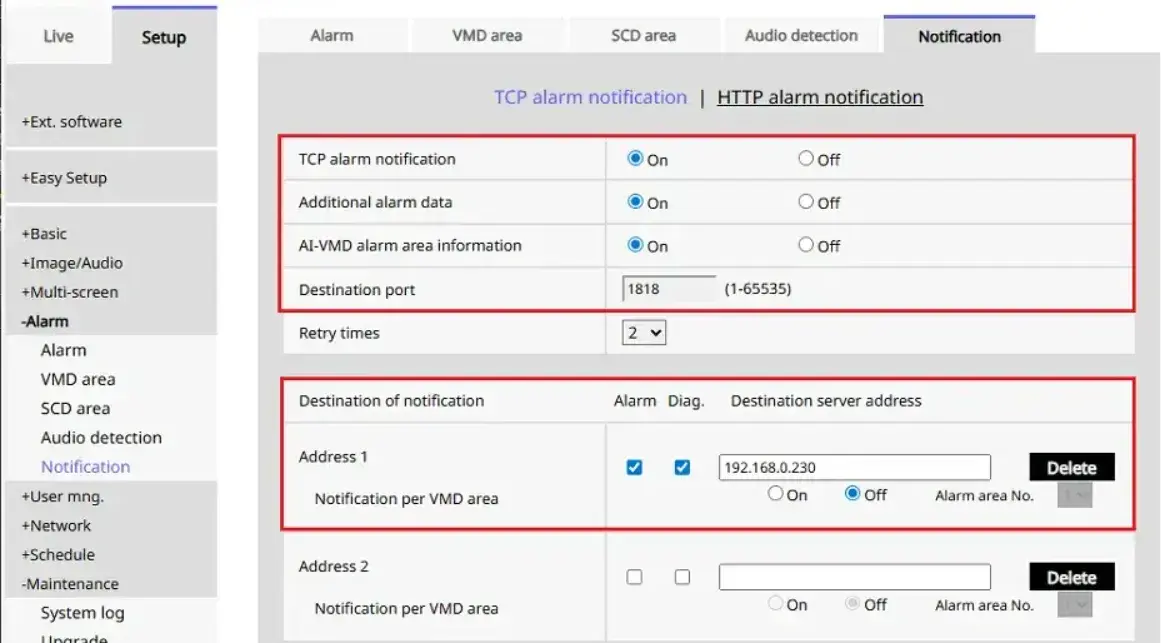
1.5 Alarm Notification Settings
1. Go to [Setup] > [Alarm] > [Notification] > [TCP alarm protocol notification].
Note:
The camera [Alarm] > [Notification] settings are automatically configured when the camera is registered with Security Center.
If alarm notifications are not received, ensure that the [Destination port] and [Destination server address] are configured correctly.
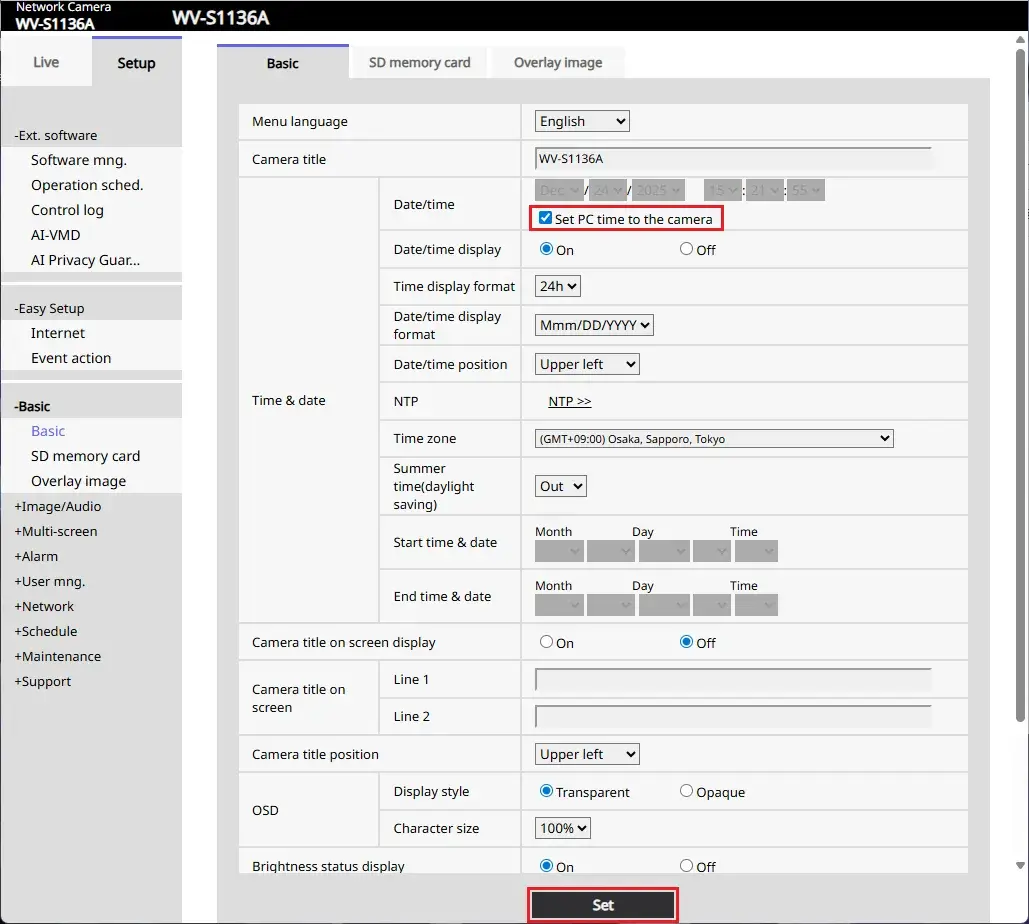
1.6 Time Synchronization
Synchronize the time between the camera and Genetec.
1. Go to [Setup] > [Basic], then under [Time & date] > [Date/time], check [Set PC time to the camera], and click [Set].
2. Genetec Settings
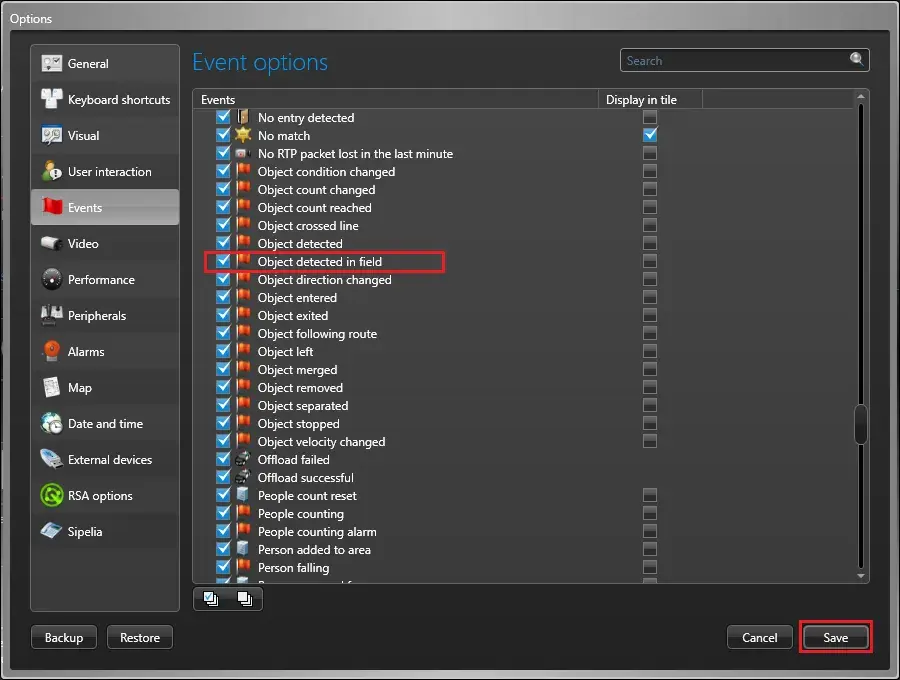
2.1 Event Notification Settings
Configure the settings so that alarms can be received in Security Desk.
1. Open Security Desk, go to [Options] > [Events] > [Event options].
2. Enable the Genetec Event you want to configure, then click [Save].

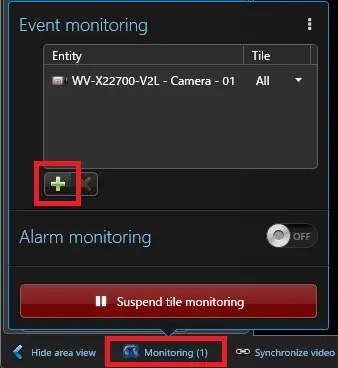
3. Go to [Security Desk] > [Tasks] > [Monitoring].
4. Click [Monitoring] in the bottom-left menu, then click [+] to add the target camera.
2.2 Event-to-action Settings (Optional)
When an AI-VMD event occurs, you can configure an action to be executed.
As an example, this section describes how to display alarm notifications on the Alarm monitoring screen.
2.2.1 Alarm Notification Settings
Configure alarm notifications for AI-VMD detection events.
To view the received alarm (event) history, go to [Security Desk] > [Tasks] > [Monitoring]. Click [Add] in [Monitoring] at the bottom-left of the screen to add the target camera, and the received alarm (event) history will be displayed.

Note:
The message format of the received AI-VMD Alarm area information displayed in the Description can be changed from Bit representation to ASCII representation.

To change it to ASCII representation, send a CGI command to the camera.
This command is supported starting from Ver2.30.

With camera firmware version 2.85 or later, for enhanced security, please include the Randomnum parameter in the CGI request.
Sample:
If the response in step 1. is randomnum=8C53C75B9462F1D8:
1. http://<ip>/cgi-bin/get_randomnum
2. http://<ip>/cgi-bin/setdata?alarm_area_format=ascii&Randomnum=8C53C75B9462F1D8
3. Ensure that [ALARM_AREA_FORMAT, "ascii"] is displayed in "cgi-bin/getdata?"
For details on the CGI specifications, please refer to “1.3. Specifications for Enhanced Security” in the "Command Interface for H.265 Supported Models".
CGI Command Document | i-PRO Products
2.2.2 Alarm Settings
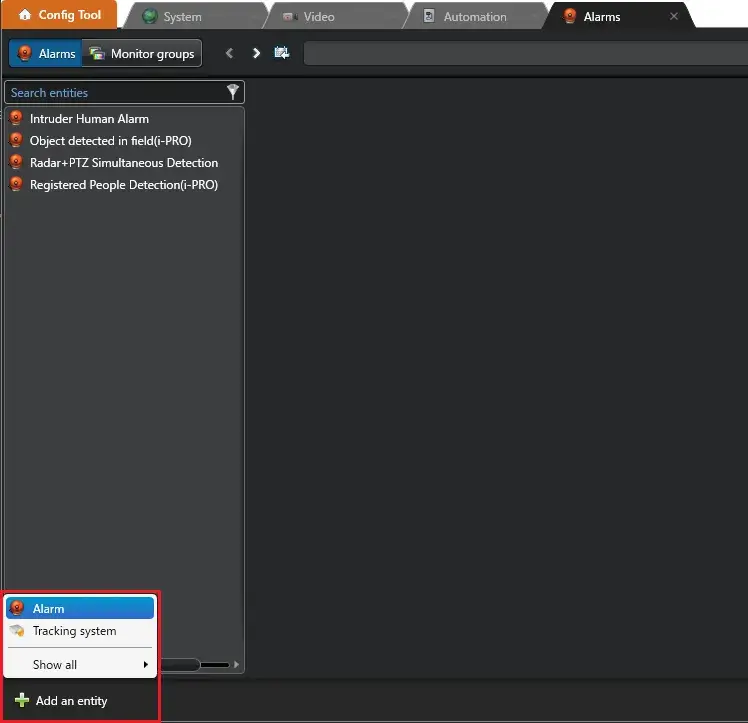
1. Open [Config Tool].
2. Go to [Config Tool] > [Alarms].
3. Click [Add an entity], and select [Alarm].
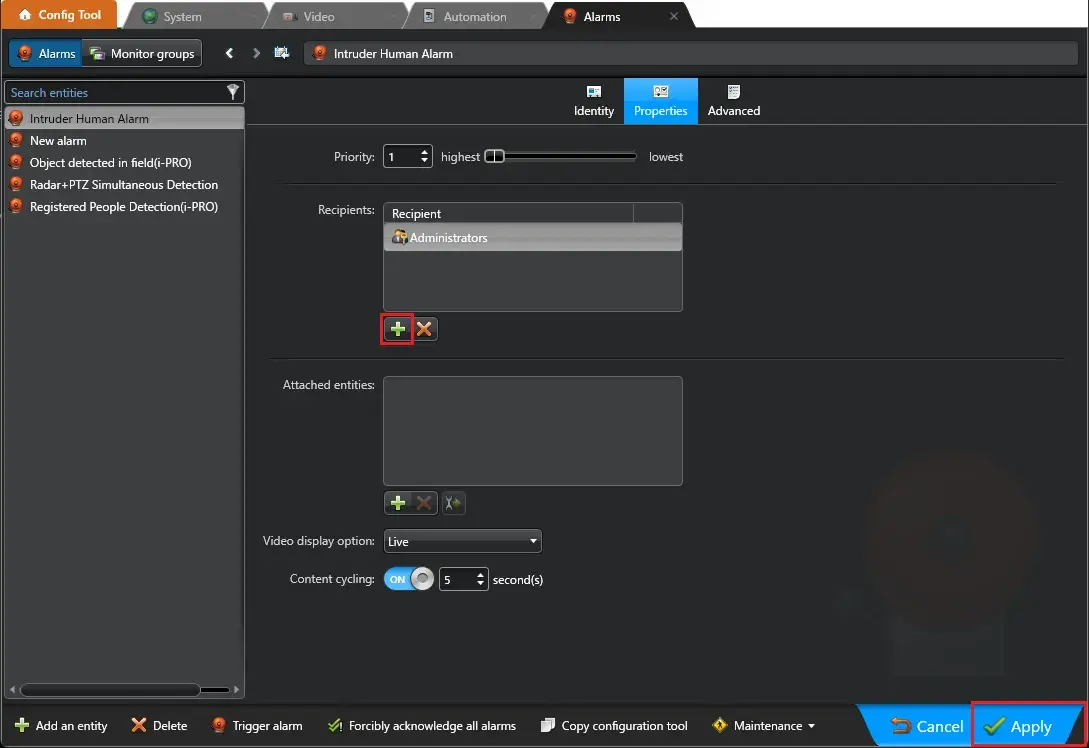
4. Enter "Intruder Human Alarm" in [Name], and then click [Apply].

5. Go to the [Properties] tab.
6. Click [+] in Recipients, and select the target users. Click [Add].
7. Click [Apply].
2.2.3 Action Settings
1. In Security Center, go to [Config Tool] > [Automation] > [Actions].
2. Click [+].
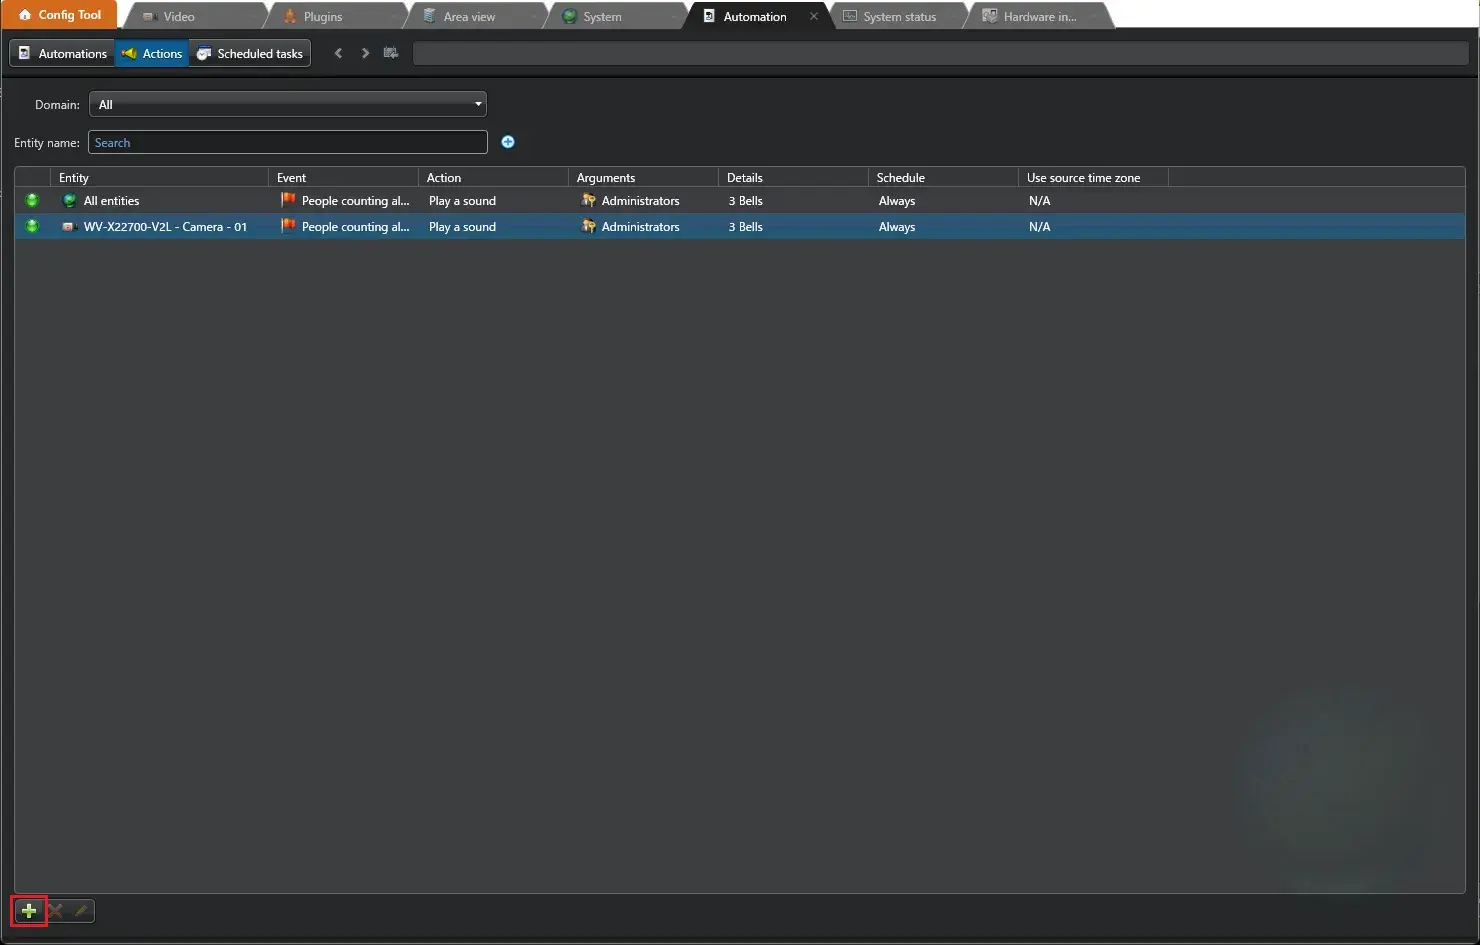
3. Set the parameters as follows.
- When: Select Genetec Event you want to configure.
- From: Select the target camera.
- Action: Select [Trigger an alarm].
- Alarm: Select the alarm you created.
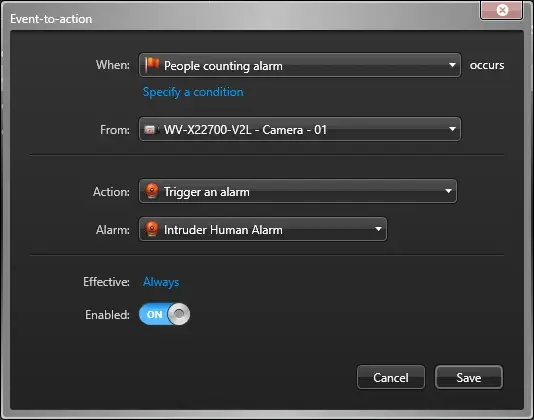
4. Click [Save].
2.2.4 How to Execute Different Actions Based on Detection Area or Detection Object (Human, Vehicle, Bicycle)
This section describes how to perform different actions based on Detection area or Detection object.
The specified conditions can be defined using the text displayed in the [Description] field of each triggered event.
As an example, this section explains how to add custom bookmarks based on Detection area or Detection object.
Note:
To configure actions based on Detection area or Detection object, Security Center 5.12.1.0 or later is required.
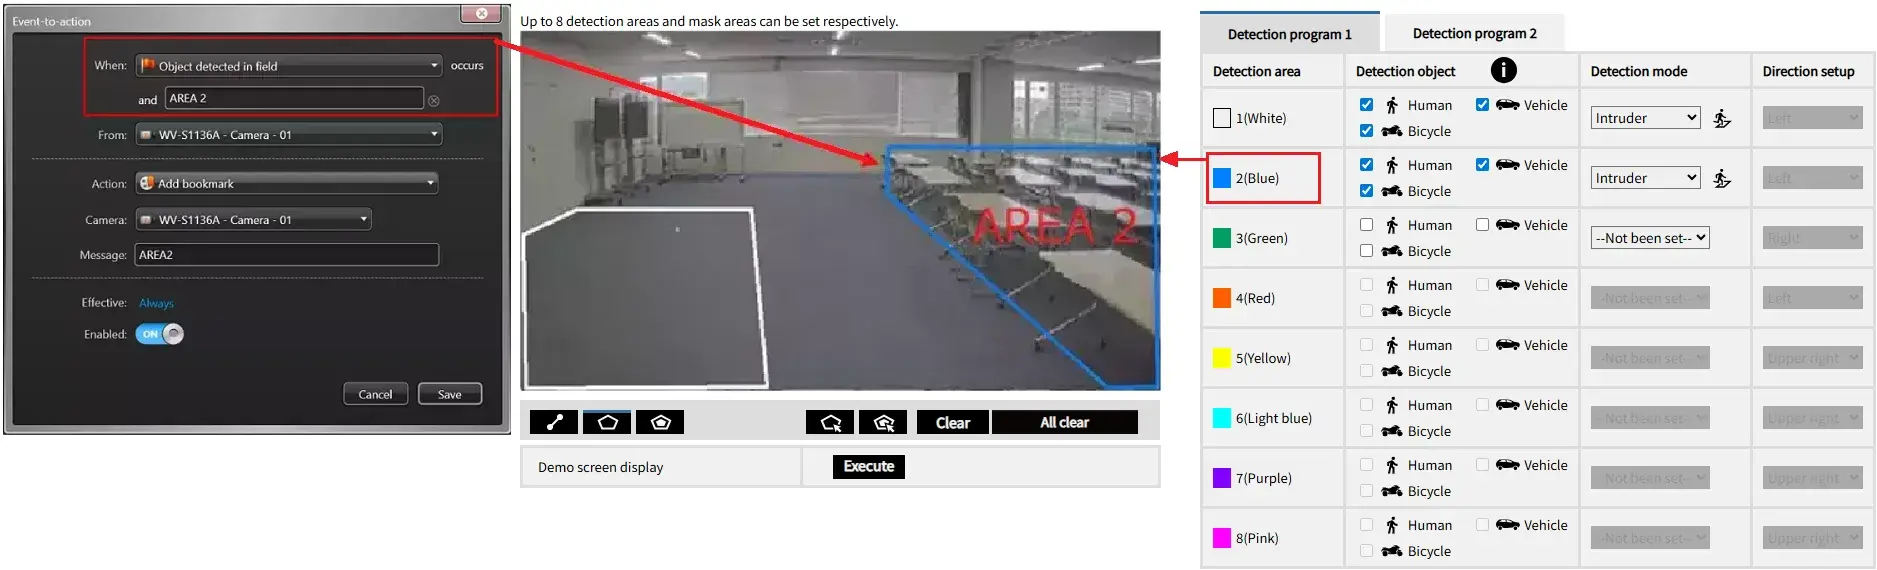
2.2.4.1 Specifying a Detection Area
1. In Security Center 5.12.1.0 or later, go to [Config Tool] > [Tasks] > [Automation], then click [+] at the bottom-left.


2. Select an event in [When] field. Refer to the table below for information on event types.
Click [Specify a condition] to display the [and] field.
For Area 1, enter "AREA 1" in the [and] field.
Note: In the upper section 3. Alarm Notification Settings, the alarm description display mode needs to be set to ASCII mode.
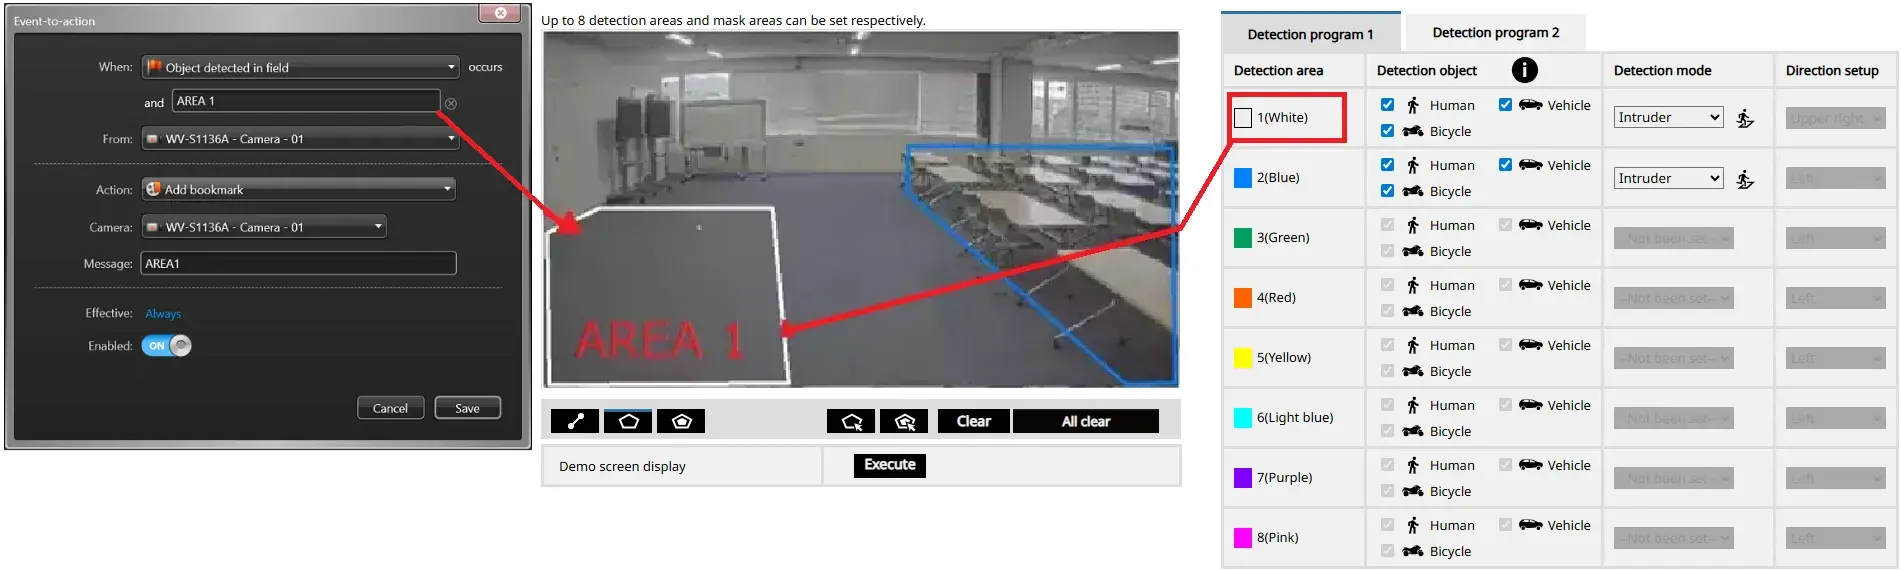
Select a source camera in the [From] field.
Select [Add bookmark] in the [Action] field and choose the target camera in the [Camera] field.
Enter a message in the [Message] field.
Note:
In the Event-to-action When field, for Genetec Event name, please select an event name that does not include (i-PRO) at the end.
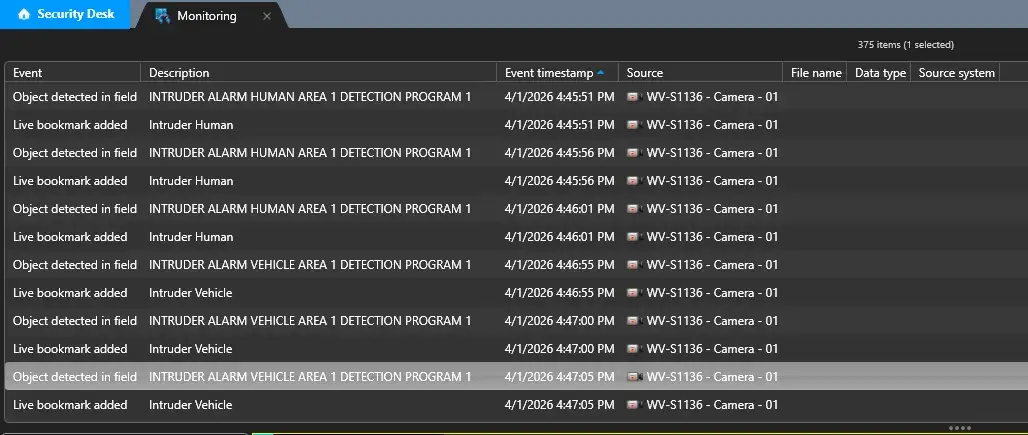
3. Similarly, configure actions for the other areas as well.
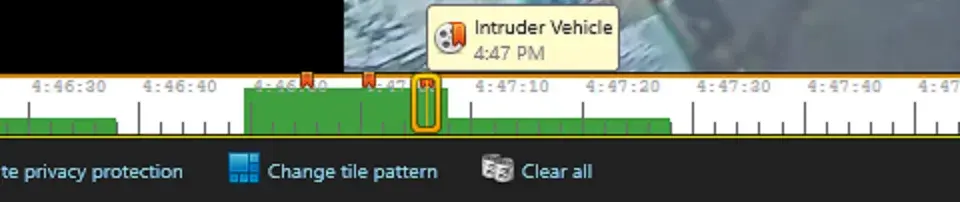
4. When an event matching the specified conditions occurs, the event is displayed on the Monitoring screen, and a bookmark will be added to the timeline with the message you set.


2.2.4.2 Specifying a Detection Object (Human,Vehicle,Bicycle)
1. In Security Center 5.12.1.0 or later, go to [Config Tool] > [Tasks] > [Automation], then click [+] at the bottom-left.
2. Select an event in [When] field. Refer to the table below for information on event types.
Click [Specify a condition] to display the [and] field.
For Human, enter "Human" in the [and] field.

Select a source camera in the [From] field.
Select [Add bookmark] in the [Action] field and choose the target camera in the [Camera] field.
Enter a message in the [Message] field.
Note:
In the Event-to-action When field, for Genetec Event name, please select an event name that does not include (i-PRO) at the end.
3. Similarly, configure actions for the other Detection object as well.
For Vehicle, enter "Vehicle" in the [and] field.

4. When an event matching the specified conditions occurs, the event is displayed on the Monitoring screen, and a bookmark will be added to the timeline with the message you set.
2.3 Recording Settings
This section introduces two recording options based on AI-VMD events. Please select either one according to your operational purpose.
2.3.1 Overview: Choosing the Proper Recording Mode
| Recording Mode | Feature | Recommended Use |
|---|---|---|
| Option A: Event-based recording | Start recording only when an AI-VMD event occurs | When storage saving is important, or when you only want to record upon event occurrence |
| Option B: Continuous recording with event-triggered enhancements | Continuous recording with quality changes or bookmarks added during AI-VMD events | For critical facilities or locations that require continuous recording |
2.3.2 Option A: Event-Based Recording
1. Go to [Config Tool] > [Video] > [Camera] > [Recording] > [Custom settings] > [Recording modes].
Select [On motion / Manual].
Configure the following settings.
・Time to record before an event:Pre-recording time.(0 to 300 sec.)
・Default manual recording length:Post-recording time.(1 to 1440 min.)
・Time to record after motion: Not required, as it does not apply to this operation.

2. Go to [Video] > [Stream usage], and set [Recording] to [ON].
The recording stream will follow the [Video quality] setting when [Recording] is set to [ON] in [Video] > [Stream usage].

Note:
If [Boost quality on event recording] is set to [ON], the following setting will be applied to the recording when an event occurs.

3. Go to [Config Tool] > [Tasks] > [Automation], then click [+] at the bottom-left.
4. Configure the [Event-to-action] settings.
Click [Save].
Event-to-action settings: (Example: Intruder detection)
When: Object detected in field
From: Target Camera
Action: Start recording
Camera: Target Camera

Note:
In the Event-to-action When field, for Genetec Event name, please select an event name that does not include (i-PRO) at the end.
2.3.3 Option B: Continuous Recording with Event-triggered Enhancements
1. Go to [Config Tool] > [Video] > [Camera] > [Recording] > [Custom settings] > [Recording modes].
Select [Continuous].

2. Go to [Video] > [Stream usage], and set [Recording] to [ON].
The recording stream will follow the [Video quality] setting when [Recording] is set to [ON] in [Video] > [Stream usage].

Note:
If [Boost quality on event recording] is set to [ON], the following setting will be applied to the recording when an event occurs.

3. Go to [Config Tool] > [Tasks] > [Automation], then click [+] at the bottom-left.
4. Configure the [Event-to-action] settings.
Click [Save].
Event-to-action settings: (Example: Intruder detection)
When: Object detected in field
From: Target Camera
Action: Start recording
Camera: Target Camera
Note:
In the Event-to-action When field, for Genetec Event name, please select an event name that does not include (i-PRO) at the end.
3. How It Works
3.1 Checking on the Monitoring Screen
1. Open Security Desk, go to the [Monitoring] tab.
2. When an AI-VMD event occurs, a [Genetec Event name] appears in the [Monitoring] tab.

3.2 Checking on the Alarm monitoring Screen
1. Open Security Desk, go to the [Alarm monitoring] tab.
2. When an AI-VMD event occurs, an [Intruder Human Alarm] alarm appears in the [Alarm monitoring] tab.

4. Bounding Box Settings (Optional)
4.1 New Configuration Options in AI-VMD V4.10
With AI-VMD V4.10 or later, you can select from the following bounding box options:
| Option | Description |
|---|---|
| Always notify | The bounding box is always displayed in all areas. (Default) |
| Notify frames in Detection area only | The bounding box is displayed only within the Detection area. |
| Notify frames immediately after alarm in Detection area | The bounding box is displayed for a few seconds in the Detection area after an alarm occurs. |
How to Configure
1. Open the camera settings screen via the browser and go to [-Ext. software] > [AI-VMD].
2. Go to [4. Detailed setting].
3. Click [+Advanced setting], then select the desired option under [Detection frame notification].
4. Click [Set].

Sample
The following example shows the Detection area on the right side.

Always notify
The bounding box is always displayed in all areas.

Notify frames in Detection area only
The bounding box is displayed only for a person in the Detection area. While a person remains in the Detection area, the bounding box is continuously displayed.

Notify frames immediately after alarm in Detection area
The bounding box is displayed in the Detection area after an alarm occurs.

After the bounding box is displayed for a few seconds, it disappears. When the alarm is triggered again, the bounding box is displayed for a few seconds.

4.2 Example of Setting to Hide Bounding Boxes for Stationary Objects
If you want to hide the bounding box of a stationary vehicle, please use it in combination with the settings [Notify frames immediately after alarm in detection area] and [An alarm is issued only when a motion is detected for the first time].
How to Configure
1. Open the camera settings screen via the browser and go to [-Ext. software] > [AI-VMD].
2. Go to [4. Detailed setting].
3. Select [An alarm is issued only when a motion is detected for the first time] under [AI-VMD alarm].
4. Click [Set].

Sample
[Notify frames immediately after alarm in detection area] and [An alarm is issued only when a motion is detected for the first time]
This behavior can be achieved by applying the setting [An alarm is issued only when a motion is detected for the first time]. When both settings are enabled, the bounding box is displayed for a few seconds on initial detection. However, even if the vehicle remains in the Detection area, no alarm is triggered and the bounding box is not shown.

Genetec Security Center 5.13.3.0 / Driver Pack 13.3