Multi-directional + PTZ camera Linkage
Last update: June, 2023
Multi-directional+PTZ camera configuration on Milestone XProtect
This function enables automatic movement of the PTZ camera by operating the mouse on the multi-directional camera screen.
By clicking on the multi-directional part screen, the pan/tilt of the PTZ camera screen moves to the corresponding position.
By dragging on the multi-directional part screen, the specified range on the PTZ camera screen will be zoomed.

Multi-directional camera screen PTZ camera screen
<Camera settings>
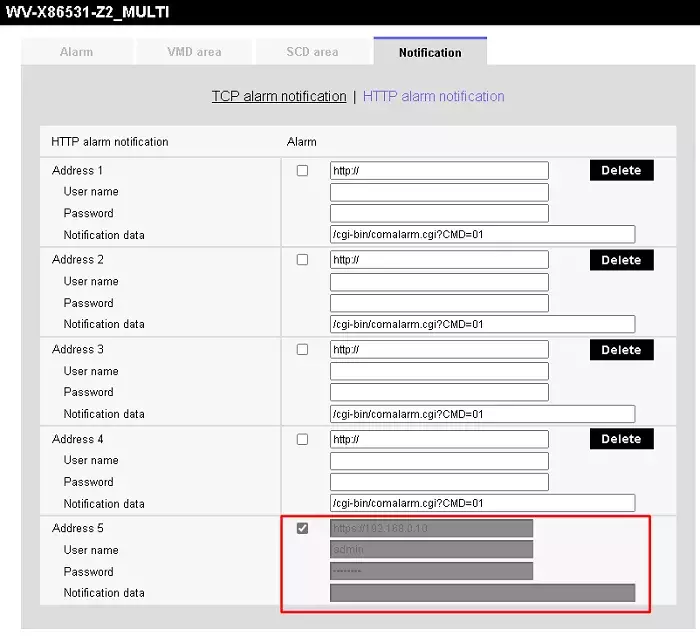
1. Open [Setup] - [Alarm] - [Notification].
2. Select the [HTTP alarm Notification].
3. Ensure that the checkbox for alarm with Address 5 is checked.
Address 5 is exclusively set for PTZ linked operation.

<Milestone Settings (Management Client)>
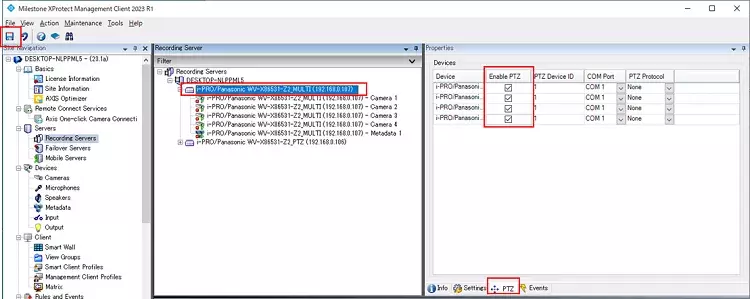
1. Select the IP Hardware in the [Recording Server] window in the Management Client.
2. In the [Properties] window, click the [PTZ] button to open the PTZ tab.
3. Enable PTZ for cameras 1-4 by checking the "Enable PTZ" option.
4. Click the [Save] button.

<Milestone Settings (Smart Client)>
1. Set the view in the Smart Client.
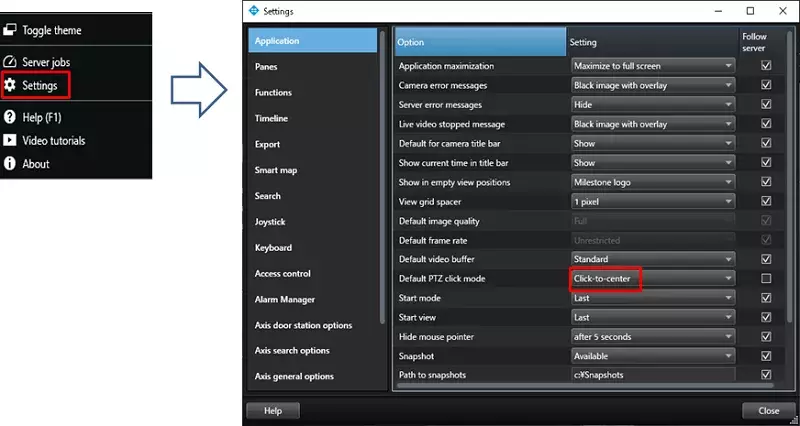
2. Click the three dots button ([Settings and more] button) at the upper right corner.
3. Select the [Settings].
4. For the [Default PTZ click mode], choose "Click-to-center".

<Operation (Smart Client)>
1. By clicking on the multi-directional part screen, the pan/tilt of the PTZ camera screen moves to the corresponding position.
By dragging on the multi-directional part screen, the specified range on the PTZ camera screen will be zoomed.
A. Pan/Tilt Operation
B. ZOOM Operation
A. Pan/Tilt Operation
A-1. Click on the multi-directional part screen.
A-2. The PTZ camera's pan/tilt will move to the corresponding position.
B. ZOOM Operation
B-1. Drag on the multi-directional part screen.
B-2. The PTZ camera will zoom accordingly.
Milestone XProtect Management Client 2023 R1 /DP 12.8a