[Operation via PC web browser]
Before operation
Display the operation window
|
|
| ||||
| ||||
|
 |
| ||||
| ||||
About the operation window
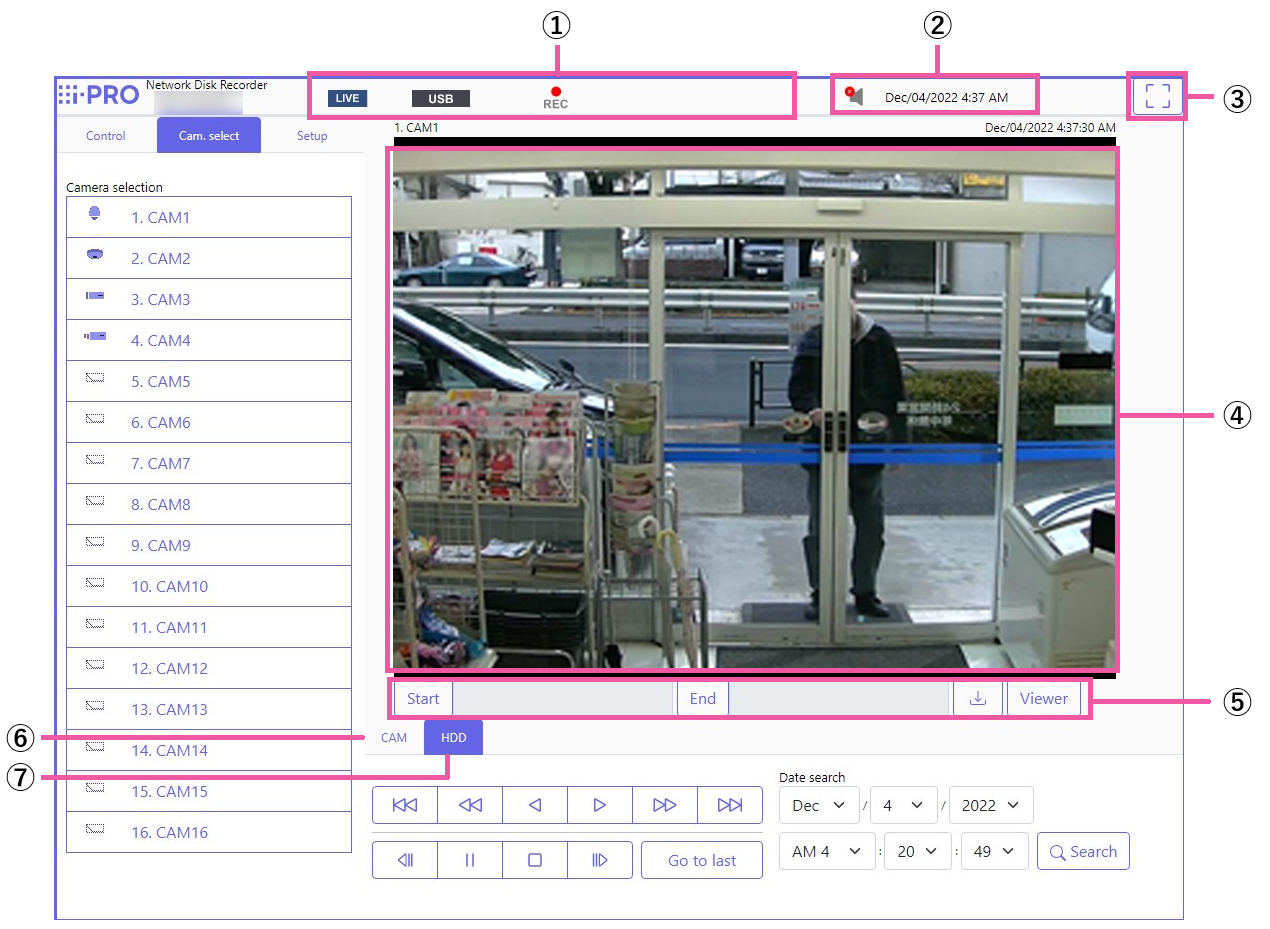
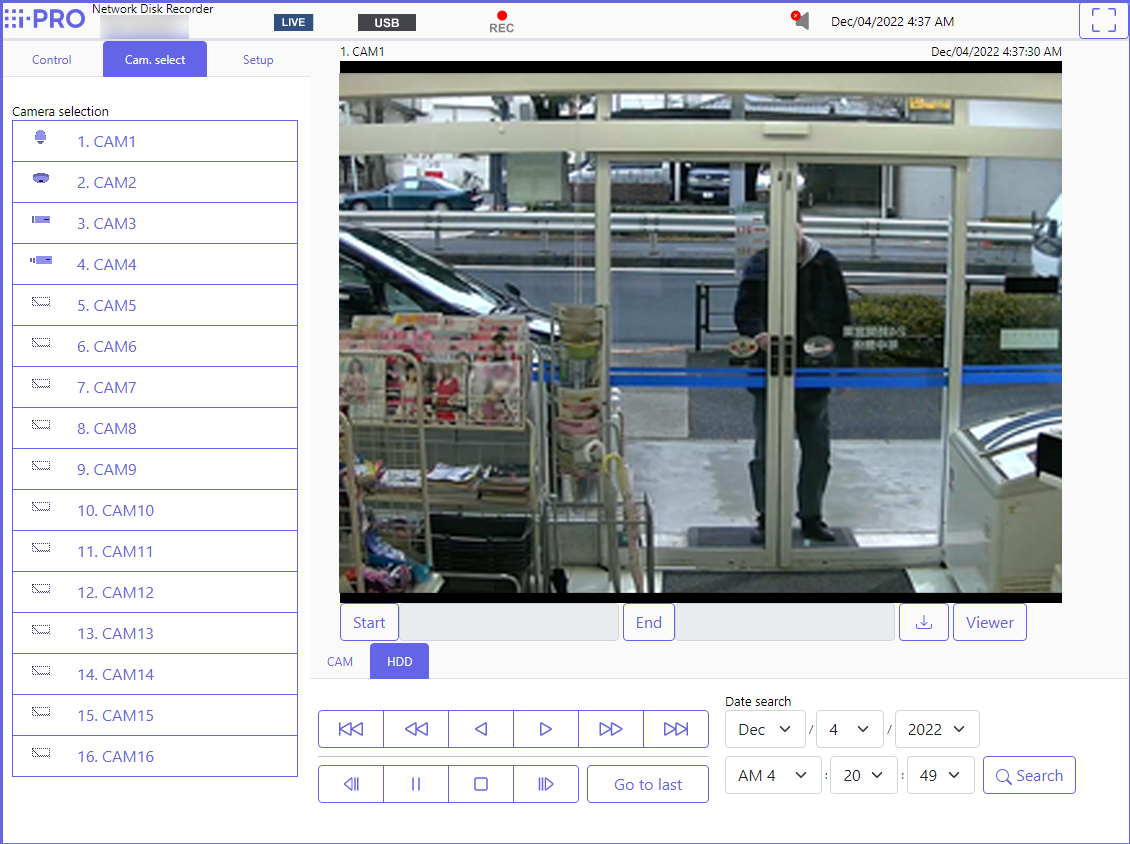
Top Page
 |
[Control] tab |
|
[Cam. select] tab |
|
[Setup] tab |
|
① Status display area |
|
② Current time display area |
|
③ [Wide view] button |
|
④ Image display area |
|
⑤ Download operation area |
|
⑥ [CAM] tab |
|
⑦ [HDD] tab |
|
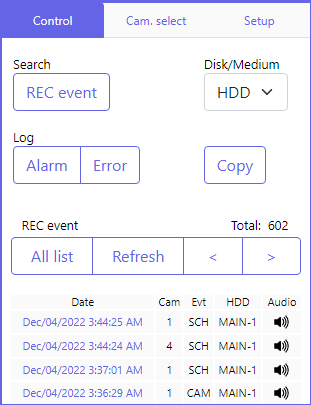
Control panel
|
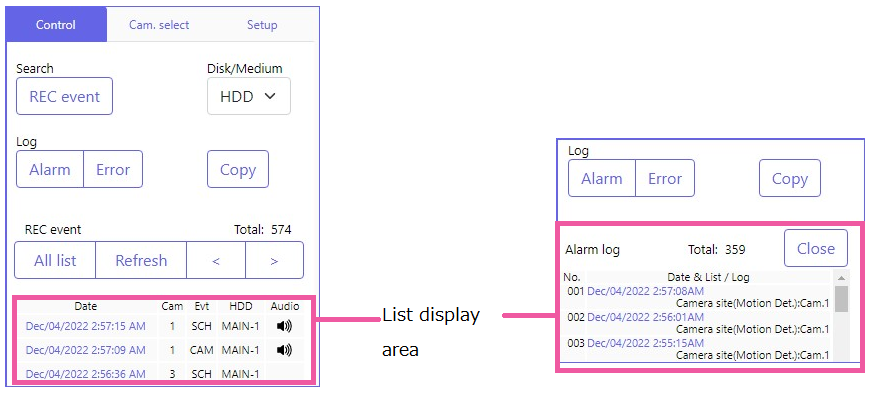 |
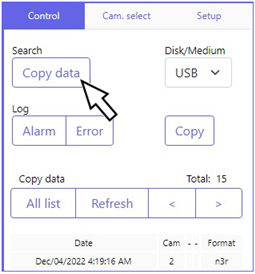
[Search] box |
|
● [REC event] button Select [HDD] for "Disk/Medium" to display this button. The recording event search window will be displayed. ● [Copy data] button Select [USB] for "Disk/Medium" to display this button. Displays the copy data search window. |
Disk/Medium |
|
[Log] box |
|
[Close] button |
|
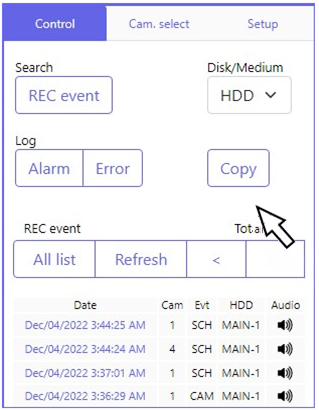
[Copy] button |
|
List display area |
|
| ||||
Camera selection panel
|
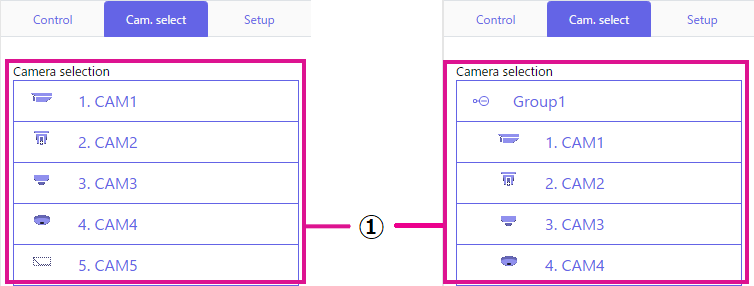 |
Camera selection box (①) |
|
Setup panel
|
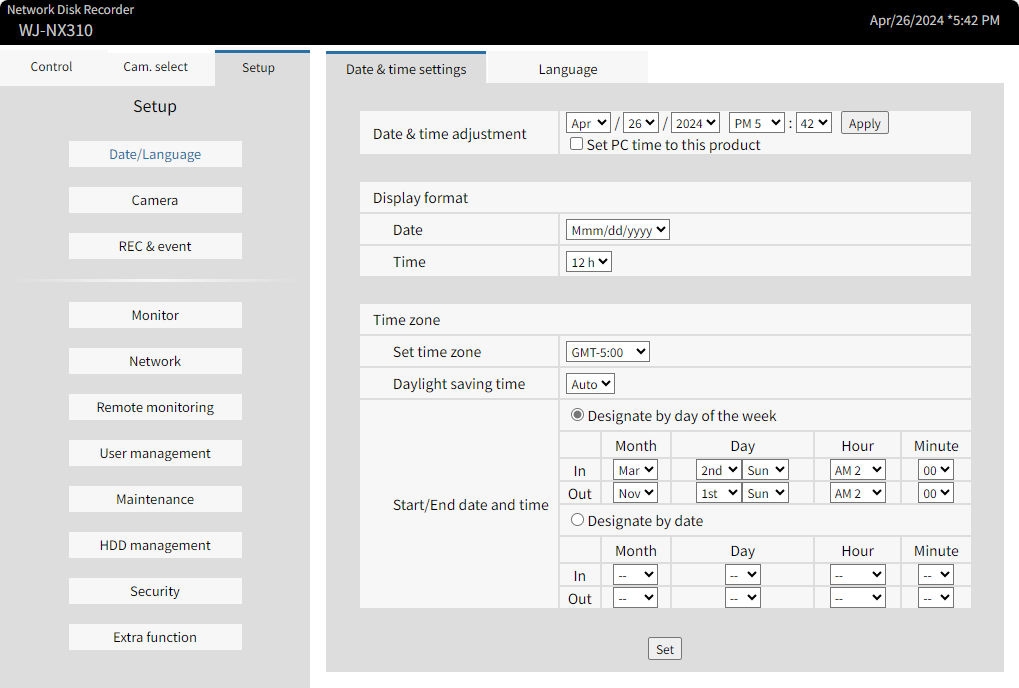 |
[Date/Language] button |
|
[Camera] button |
|
[REC & event] button |
|
[Monitor] button |
|
[Network] button |
|
[Remote monitoring] button |
|
[User management] button |
|
[Maintenance] button |
|
[HDD management] button |
|
[Security] button |
|
[Extra function] button |
|
Status display area
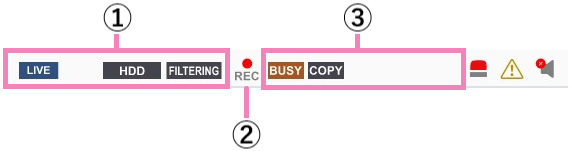 |
① Live/playback status display area |
|
 : Indicates that live images are being displayed.
 : Indicates that playback images are being displayed.
 : Indicates that reverse playback images are being displayed.
 : Indicates that fast playback images are being displayed.
 : Indicates that fast reverse playback images are being displayed.
 : Indicates that a paused image is being displayed.
 : Indicates that recorded images/audio are being downloaded.
 : Indicates that downloading of recorded images/audio is completed.
 : Normal playback speed (1x)
 : Approx. 2x playback speed
 : Approx. 4x playback speed
 : Approx. 8x playback speed
 : Approx. 16x playback speed
 : Approx. 32x playback speed
 : Approx. 48x playback speed
 : Indicates that the HDD is selected as playback media.
 : Indicates that the USB medium is selected.
 : Indicates that the formatting of the HDD or the USB medium is in progress.
 : Indicates that SD memory data is being obtained.
 :Indicates that data recovery in the RAID mode is being performed.
 : Indicates filtering of recording events.
② Recording indicator |
|
 : Indicates that recording is being performed.
  : Indicates that recording is not being performed.
 ③ Other status display area |
|
 : Indicates that the camera is inoperable since a user with a higher priority is currently operating the camera.
 : Indicates that copying is being performed.
 : Indicates that recorded images are being deleted. (Auto deletion only)
Alarm button [ALM]  |
|
Error button [ERR]  |
|
| ||||
Mute button [MUTE] |
|
 : Muted.
 : Unmuting is in progress.
Download operation area
 |
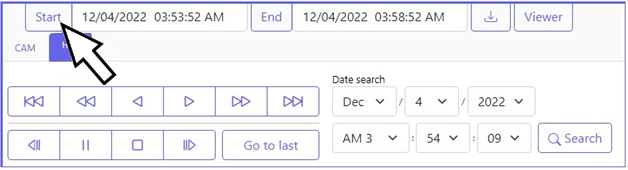
[Start]/[End] setup |
|
[Download] button  |
|
[Viewer] button |
|
[CAM] tab
|
 |
[HDD] tab
|
 |
View
Monitor live images
|
| ||||
Display live images
|
|
 |
|
| ||||
Display images in wide view |
|
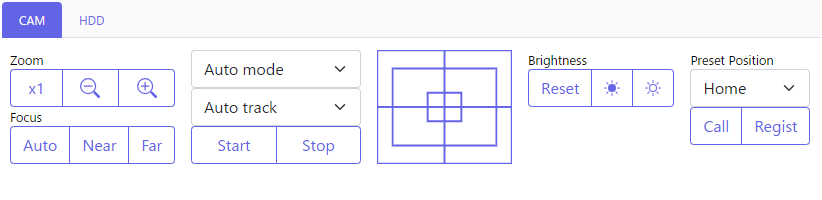
Operate the camera
|
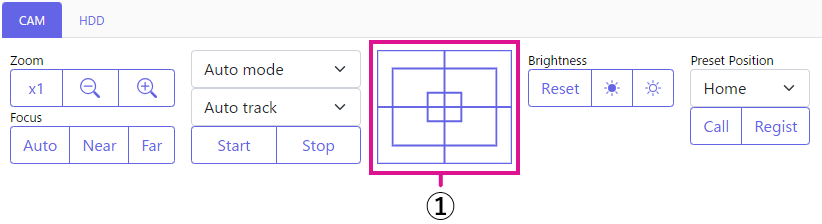 |
|
| ||||||||||||||||||||||||||||||||||||||||||||||
 or
or  button. Click the [Standard] button to return brightness setting to standard.
Event function
About event function
|
Action to be taken upon an event occurrence
|
Display the alarm message |
|
 |
|
Display the alarm button |
|
Display the error button |
|
Cancel the alarm action
|
 |
|
Cancel the error action
|
 |
|
| ||||
Play
Play recorded images
|
| ||||
|
|
|
|
| ||||
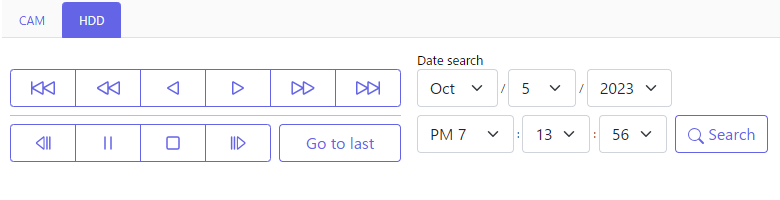
About playback operation
|
| |||||||||||||||||||||||||
 /
/ 


 /
/ 
 /
/ 
 /
/ 

Play image recorded at a designated date & time
|
|
|
|
 |
|
| ||||
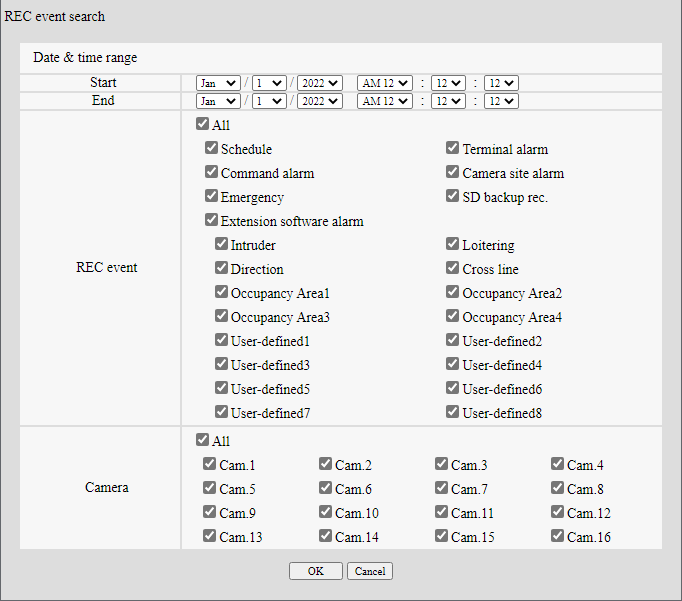
Search and play recording events (REC event search)
|
| ||||
|
 |
|
[Date & time range] |
|
[REC event] |
|
| ||||
[Camera] |
|
|
 |
[Total] |
|
[All list] button |
|
[Refresh] button |
|
[Prev page (<)] button |
|
[Next page (>)] button |
|
[Date] |
|
[Cam] |
|
[Evt] |
|
[HDD] |
|
[Audio] |
|
| ||||
|
Useful functions
Copy recorded images
|
|
 |
|
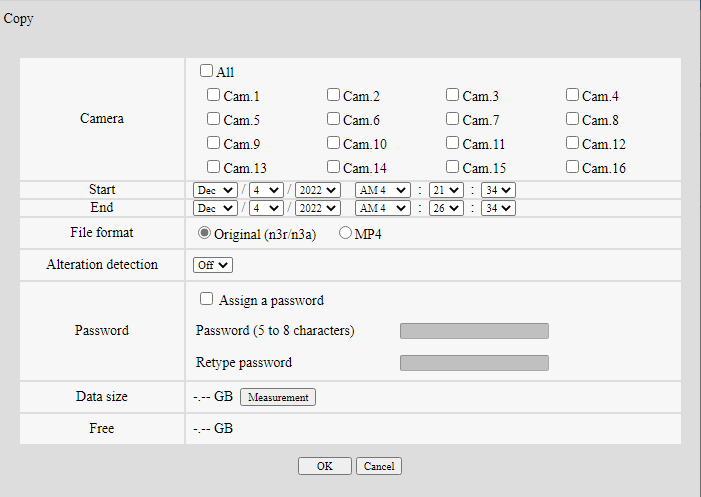 |
[Camera] |
|
[Date & time range] |
|
[File format] |
|
[Alteration detection] |
|
[Password] |
|
[Data size] |
|
[Free] |
|
|
| ||||
Check a list of copied recorded images
|
|
 |
|
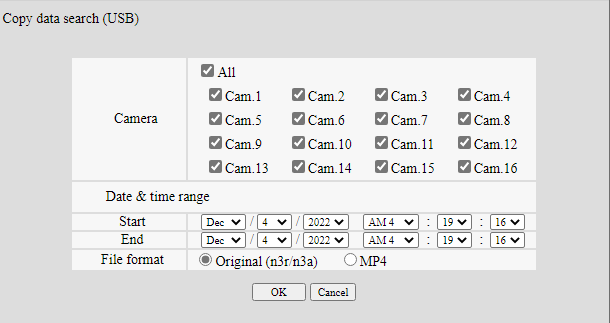 |
[Camera] |
|
[Date & time range] |
|
[File format] |
|
|
 |
[Total] |
|
[All list] button |
|
[Refresh] button |
|
[Prev page (<)] button |
|
[Next page (>)] button |
|
[Date] |
|
[Cam] |
|
[Format] |
|
| ||||
| ||||
Download recorded images currently being played
|
| ||||
|
 |
|
|
| ||||
|
 |
|
| ||||
Play back the copied/downloaded images on a PC
|
To play recorded images copied on the media device
|
Play recorded images downloaded using a web browser
|
Download the viewer software |
|
How to use the viewer software
|
| ||||
| ||||
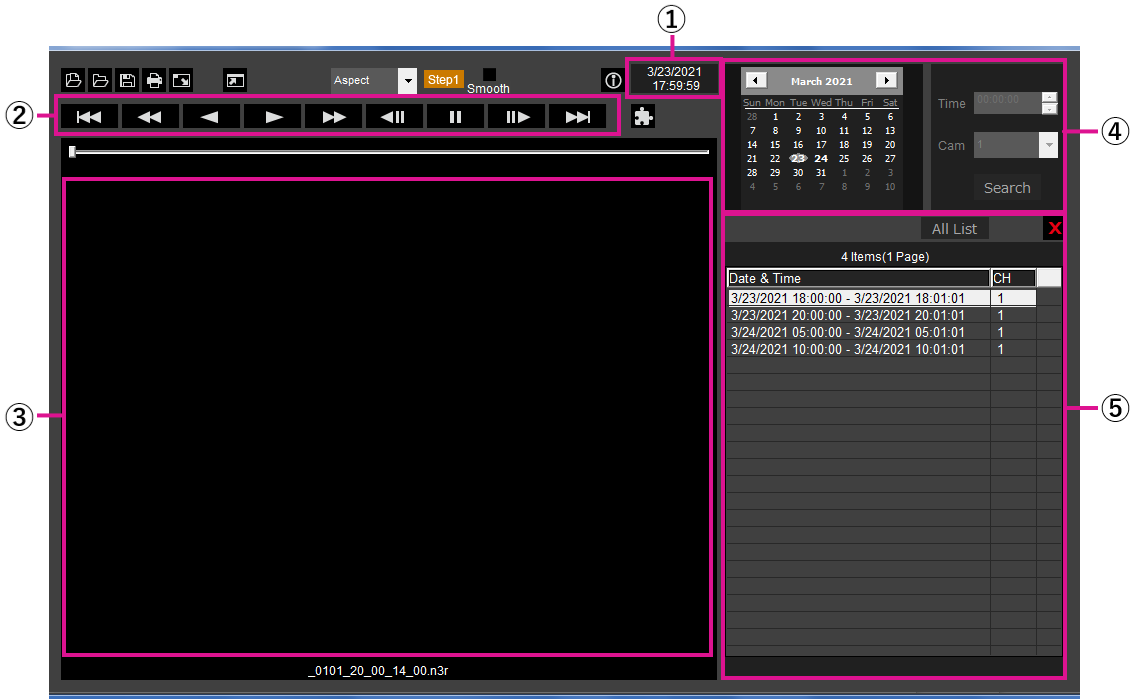 |
 Playback operation window when images are displayed on a full screen |
|
Select playback images |
|
 button.
| ||||
|
| ||||
 ]button will delete all data displayed on the list. Another way to clear the list is to right-click the list and select [Clear all list].
Playback downloaded images |
|
| ||||
|
 : Starts the playback.
 : Plays the image backwards.
 : Plays the image at high speed.
 : Plays the image backwards at high speed.
 : Pauses the playback.
 : Moves to the next image. It is operable only when playback is paused.
 : Returns to the previous image. It is operable only when playback is paused.
 : Plays the next recording file on the list.
 : Plays the previous recording file on the list.
Change the playback time and date |
|
|
Make the image easy to see |
|
|
 Enlarges the window screen display.
 Returns the enlarged window screen display to the original size.
 Display the image maximized to the whole window.
|
 Displays the image in the screen with the aspect ratio kept.
 Displays the image with it expanded or contracted to fit in the screen.
 Displays 1 pixel of the screen on 1 dot.
|
 Checking the box enables a smooth, high-speed playback.
|
 Returns the image to the fisheye image.
 Corrects the image on 1-screen PTZ.
 Corrects the image on 4-screen PTZ.
Adjust the volume |
|


 Adjusts the volume. Clicking the button can switch the volume in three levels.
 Toggles Audio playback/Silent.
Detect alteration of the image data |
|
|
 button.
Save still images |
|
 : Saves the image on pause in JPEG file with a new name.
Save image data (copy) |
|
|
Print the displayed image |
|
 : Prints the image on pause with the date and time.