How do I Backup and Restore my MonitorCast settings?
- Video Insight VMS
- Installation/Configuration
MonitorCast settings can be backed up and restored manually or through the AC Manager.
Case 1. Manual Backup and Restore
Backup AC Settings
1. HKLM > Software > Wow6432Node > Video Insight, Inc
2. Right Click Video Insight, Inc
3. Export to the destination folder
4. Go to the start menu
5. Go to your system's Start menu and choose Run.
6. Type: services.msc
7. Stop the SQL Server (MSSQLSERVER) service
8. Locate "Microsoft SQL service"
9. Right-Click and choose Stop.
10. Go to C:\Program Files\Microsoft SQL Server\MSSQL10_50.MSSQLSERVER\MSSQL\DATA
11. Copy VIAC.mdf and VIAC_log.LDF files
12. Paste these files in a destination folder
13. Start the SQL service again.
Restore AC Settings
1. Go to Start > Run
2. Type: services.msc
3. Find "Microsoft SQL service"
4. Right-Click and choose Stop.
5. Locate your saved files and copy InsightENT.mdf and InsightENT_Log.ldf
6. Browse to My Computer > Local Disk C > Program Files > Microsoft SQL Server > MSSQL.1 > MSSQL > DATA
7. Paste VIAC.mdf and VIAC_log.LDF files and replace the existing if they exist.
8. Locate your saved files and double-click your Registry export file (ends with .reg). This will re-install your registry keys.
9. Locate services.msc again.
10. Find "Microsoft SQL service"
11. Right-click and choose Start.
Case 2. System Backup, Restore, & Scheduling through the AC Manager
Database Backup
1. To back up system settings, including registry keys and SQL database, in the AC Manager click System Tools and then select System Backup.

2. Click Next on the following screen. The database information will populate the local machine’s information for the backup.

* NOTE - It is possible to back up a different database. To do so, click on Edit Database.
3. Click Browse to choose the location for the Backup folder. In this example, the folder is saved to: C:\ProgramFiles\MonitorCast
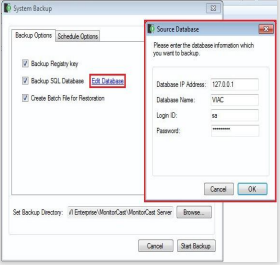
* NOTE - Do not save to the desktop.
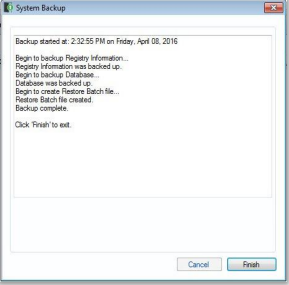
4. Click Start Backup to begin the backup process. A summary appears when the process is completed.
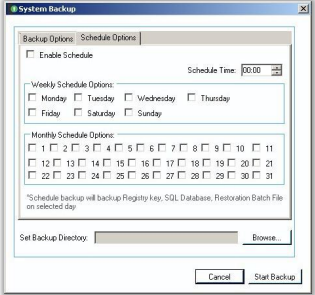
5. Selecting the Backup Schedule Tab reveals the new scheduling options that are available.
Available options:
- Enable Schedule.
- Schedule Time.
- Weekly Scheduling.
- Monthly Scheduling.
- Designated Backup Directory
RESTORE DATABASE AND REGISTRY FROM BACKUP
1. To restore the database, browse to the Backup folder and double-click the Restore command file.
2. A confirmation window appears. ‘CRTL + C’ cancels the command.

Article number:apac-en123441
Last updated:October 16, 2025
Was this article helpful?