AI-VMD
Last update: Nov, 2024
Table of contents
- AI-VMD "Basic configuration"
This is the setting procedure for receiving AI-VMD alarms with Milestone.
- AI-VMD "How to add a stop event alarm"
This is the setting procedure for receiving AI-VMD Stop alarms with Milestone.
- AI-VMD "Milestone Metadata Search Integration"
You can search for people, vehicles, and vehicle speed using [Search] feature in SmartClient.
AI-VMD "Basic configuration"
AI-VMD alarm configuration on Milestone XProtect
Condition
AI-VMD has the following types of detection.
In this example, we will use "Intruder Human" to explain the procedure.
| Detection mode | Detection object |
|---|---|
| Intruder | Human |
| Intruder | Vehicle |
| Intruder | Bicycle |
| Loitering | Human |
| Loitering | Vehicle |
| Loitering | Bicycle |
| Direction | Human |
| Direction | Vehicle |
| Direction | Bicycle |
| Cross line | Human |
| Cross line | Vehicle |
| Cross line | Bicycle |
<Setup using "i-PRO Configuration Tool for Milestone">
1. Register the camera to the XProtect.
2.Click the [i-PRO Settings] under [MIP plug-ins] - [i-PRO Configuration Tool for Milestone].
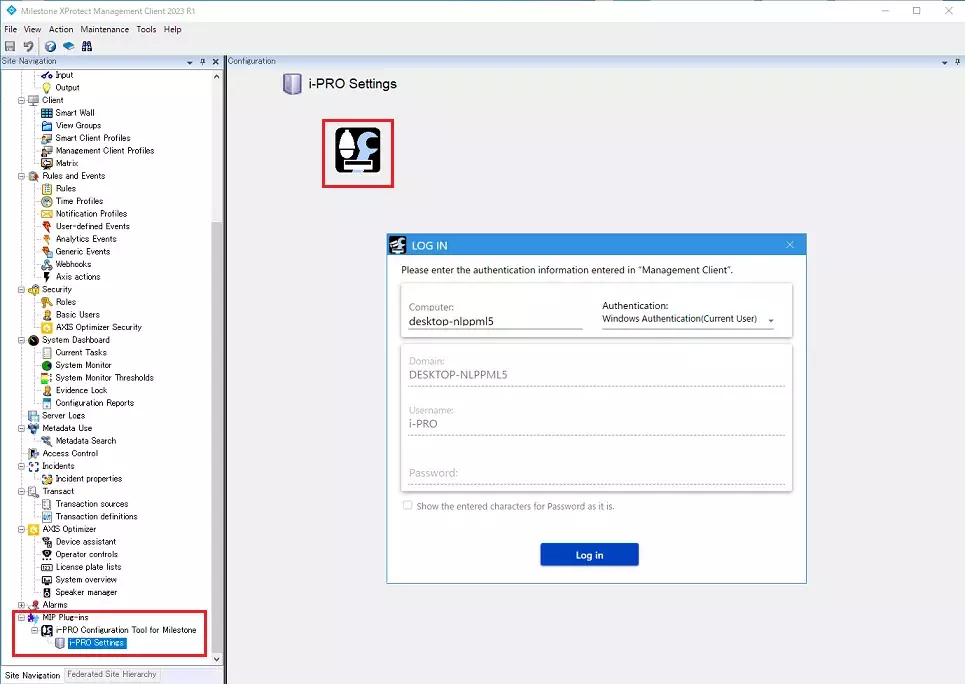
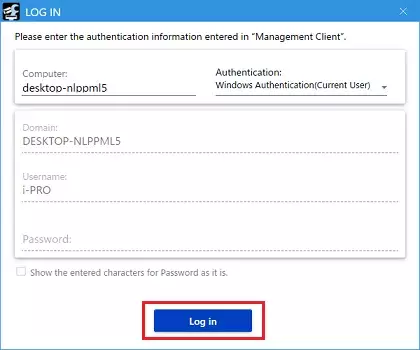
3. Click the [Log in] button.
*For Windows authentication (current user), you can log in without entering Username/Password.
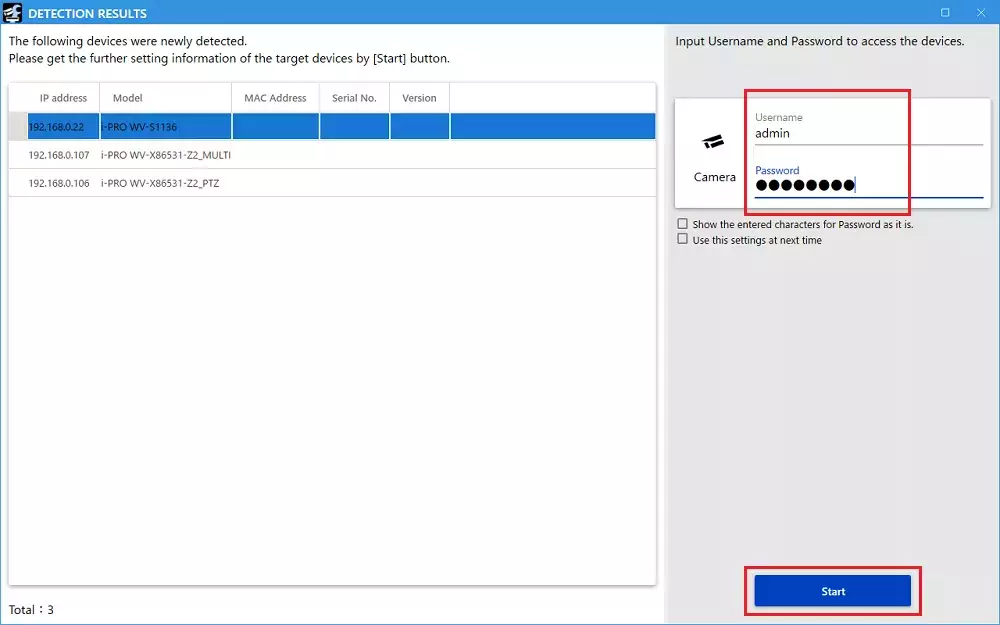
4. Select the target device and enter the [Username] and [Password] to access the device.
5. Click the [Start] button.
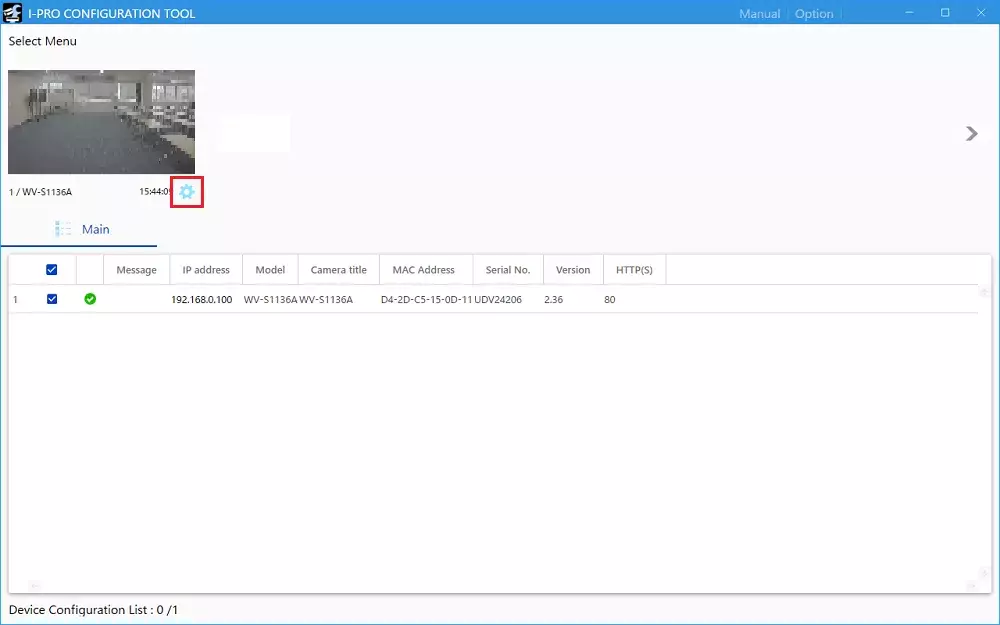
6. Click gear icon to open camera setup.
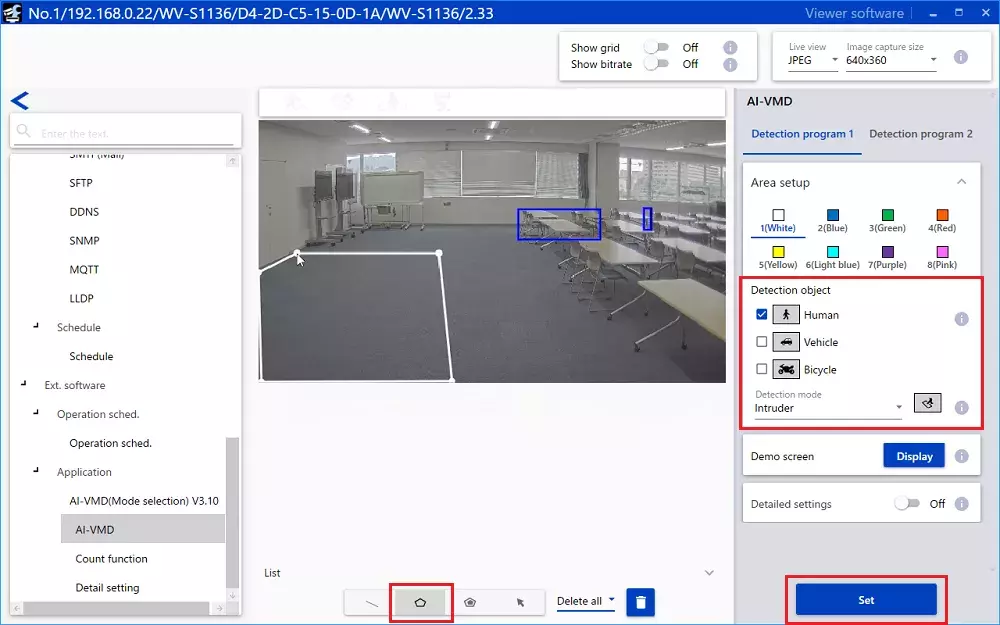
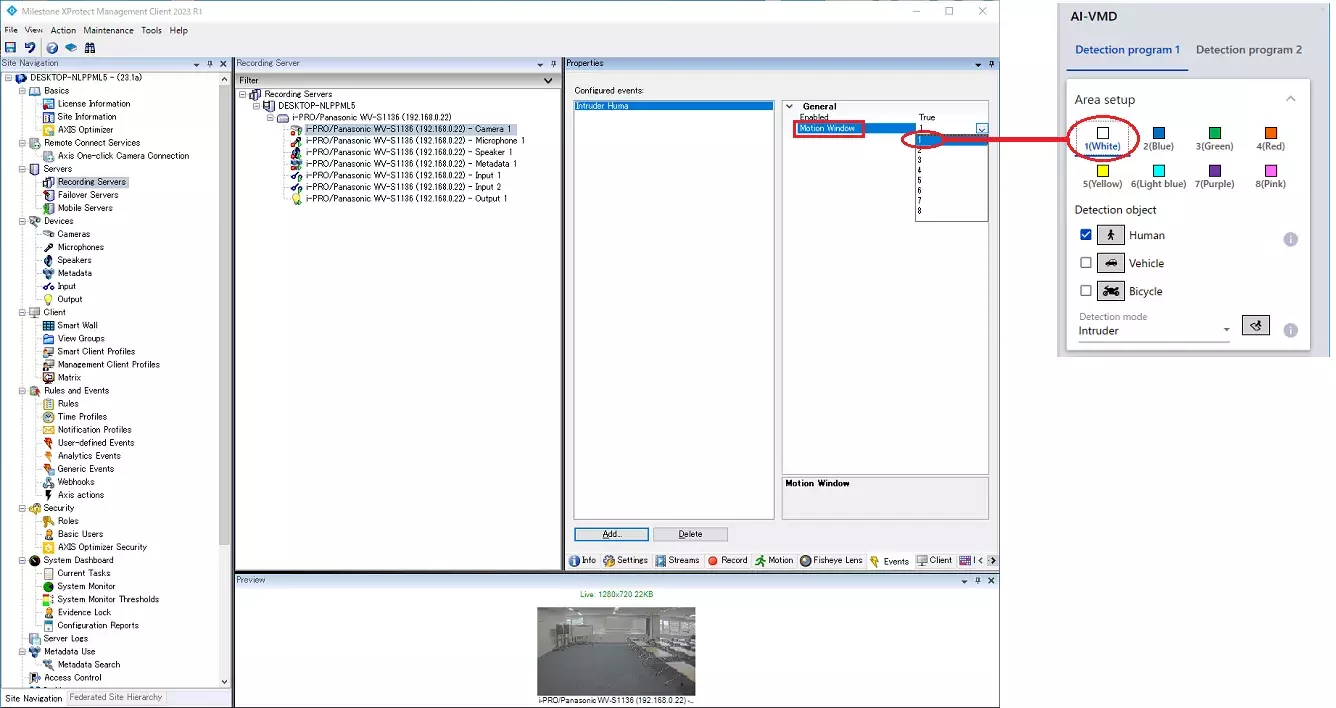
7. Detection area setting
Select [Ext. software] - [Application] - [AI-VMD].
Specify the area, set the [Detection object] / [Detection mode], and click the [Set] button.
Each detection area is assigned an area ID based on the color of the [Area Setup].
The area ID is used as the value for [Motion Window] in Step 4 of the <Alarm Setup in XProtect Management Client>.
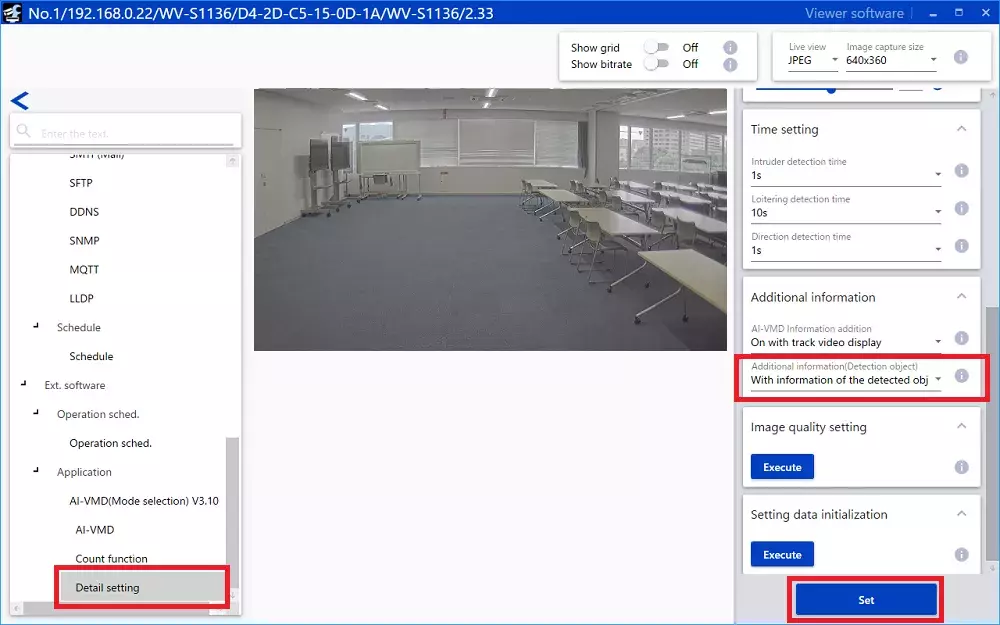
8. Detailed setting
Select the [Detail setting] and configure the necessary settings.
*If you want to display the details (object type) when receiving alarm notifications on the XProtect side, set [Additional information(Detection object)] to "With information of the detected object(Alarm frame)".
Click the [Set] button after completing the settings.
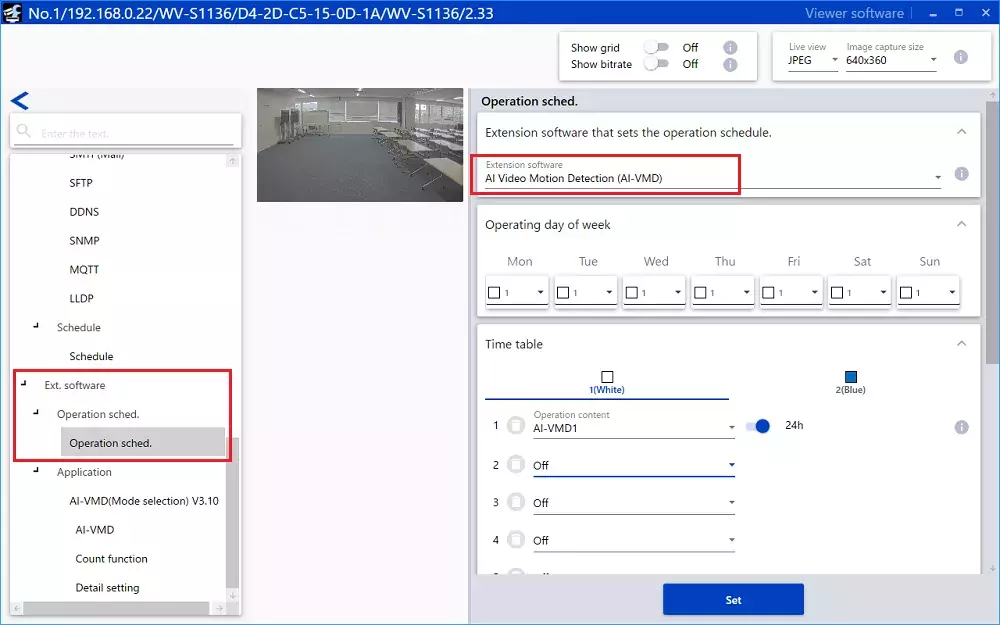
9. Schedule settings
Select [Ext. software] - [Operation sched.].
Select "AI Video Motion Detection (AI-VMD)" in the [Extension software] and set the schedule to enable detection.
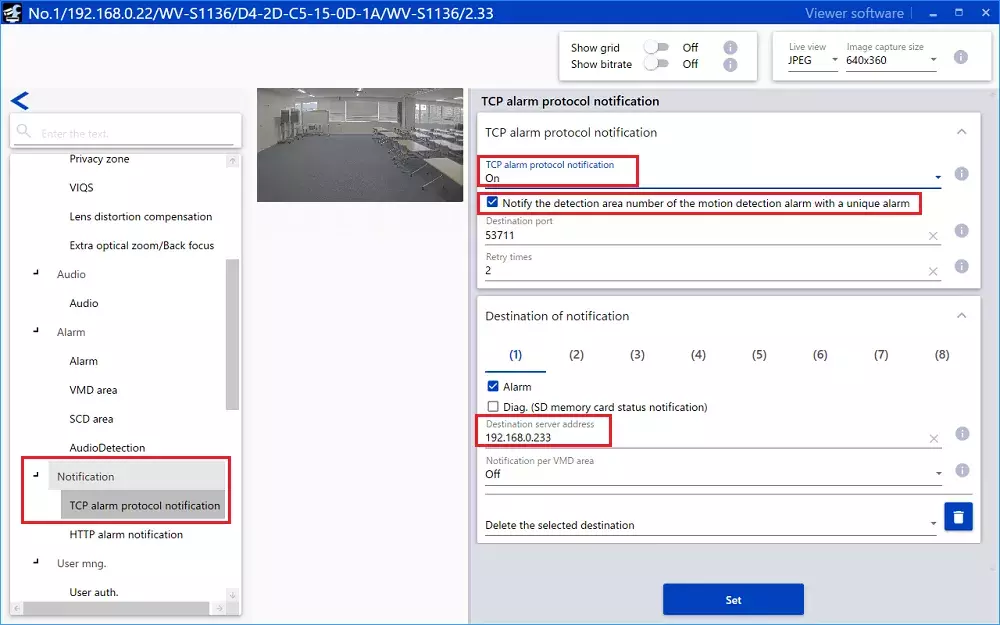
10. Alarm notification settings
Select [Notification] - [TCP alarm protocol notification].
Confirm that [TCP alarm protocol notification] is "On", [Notify the detection area number of the motion detection alarm with a unique alarm] is checked and [Destination server address] of [Destination of notification] is set.
This setting is automatically configured when you set an event in Milestone.
Also, the "Destination Port" is assigned a port number by Milestone.
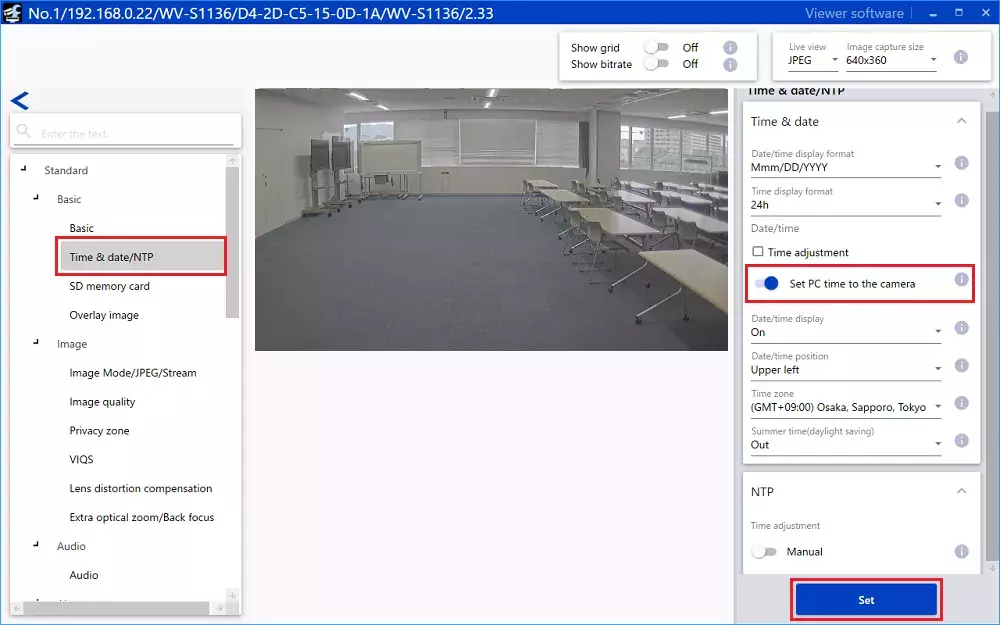
11. Time synchronization
Ensure that the time is synchronized between the camera and Milestone.
Select [Standard] - [Basic] - [Time & data/NTP].
Turn on the "Set the specified time to the camera" radio button to enable "Set PC time to the camera", and click the [Set] button.
<Alarm setup in XProtect Management Client>
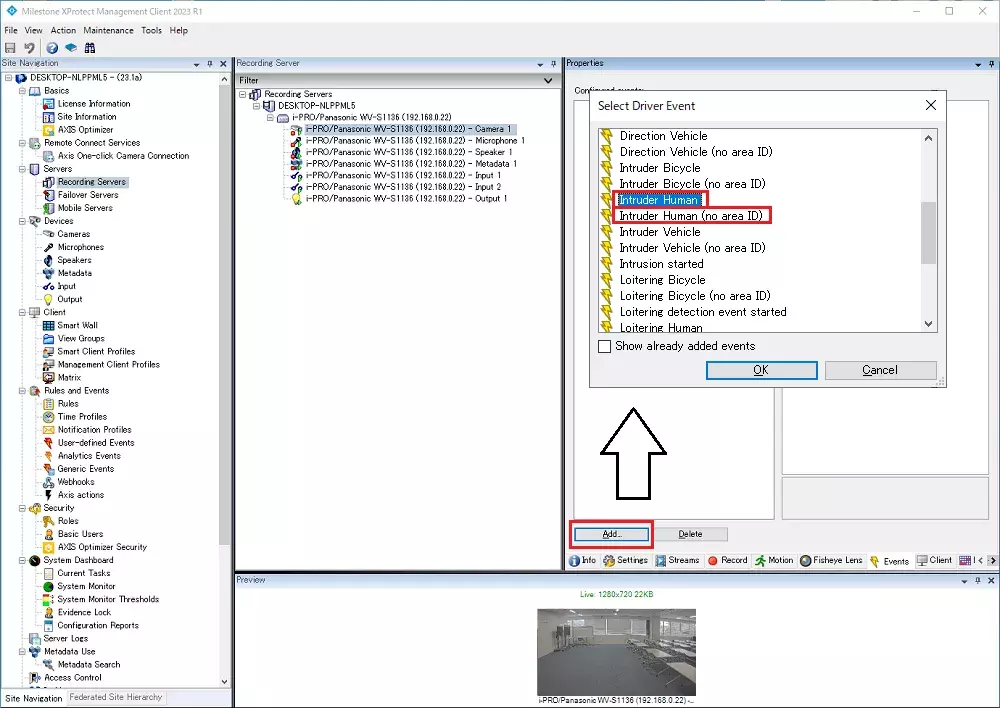
1. Select the target camera device in [Servers] - [Recording Servers] and click [Events].
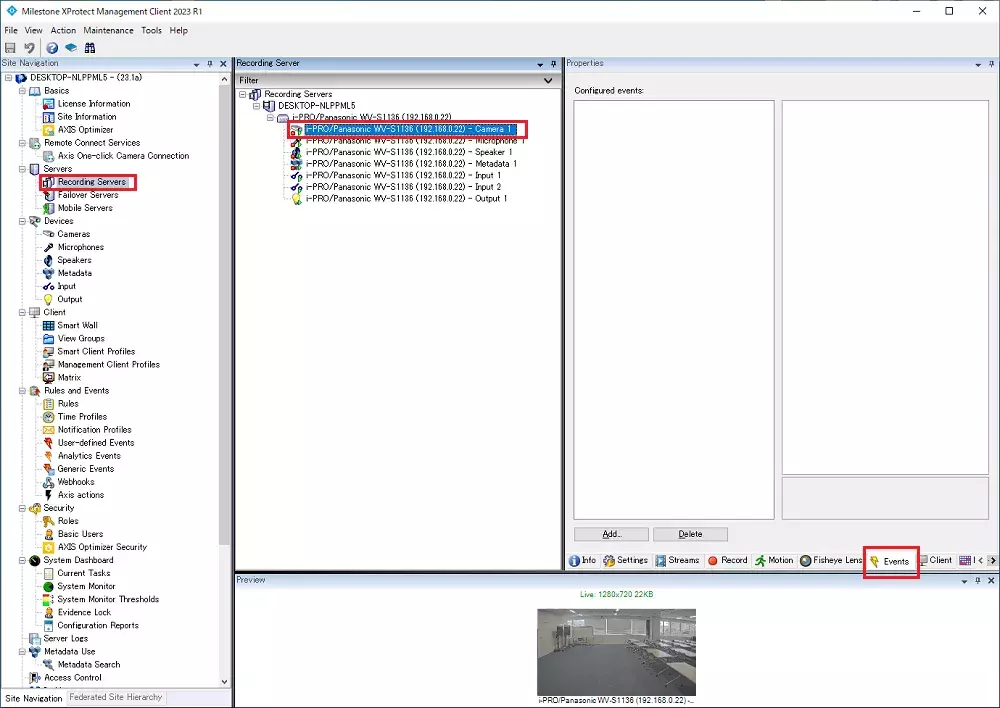
2. Click the [Add...] button, select an event on the [Select Driver Event] screen, and click the [OK] button.
In Step 10 of the <Setup using "i-PRO Configuration Tool for Milestone">, if [Notify the detection area number of the motion detection alarm with a unique alarm] is not checked, select an event with "(no area ID)" label attached to it.
3. Set the area ID that was added in Step 7 of the <Setup using "i-PRO Configuration Tool for Milestone"> in the [Motion Window] of the added event.
After confirming the addition, save it by clicking [Save] at the top left of the screen.
4. Click on [Rules and Events] - [Rules] in the [Site Navigation] area.
Then right click on [Rules] in the [Rules] area and select [Add Rule...].
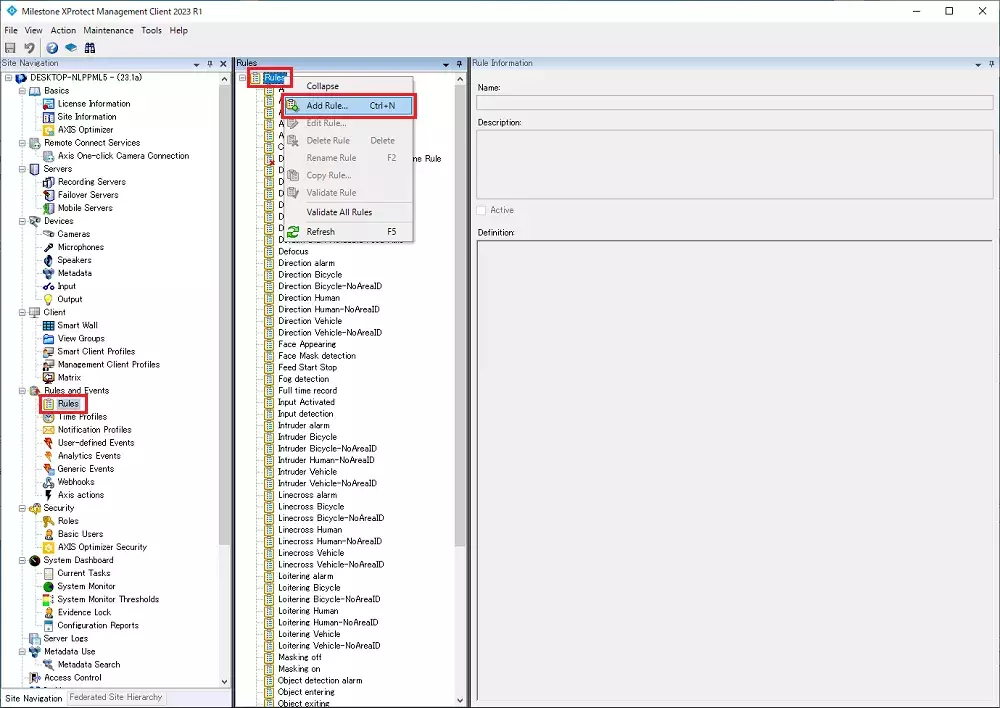
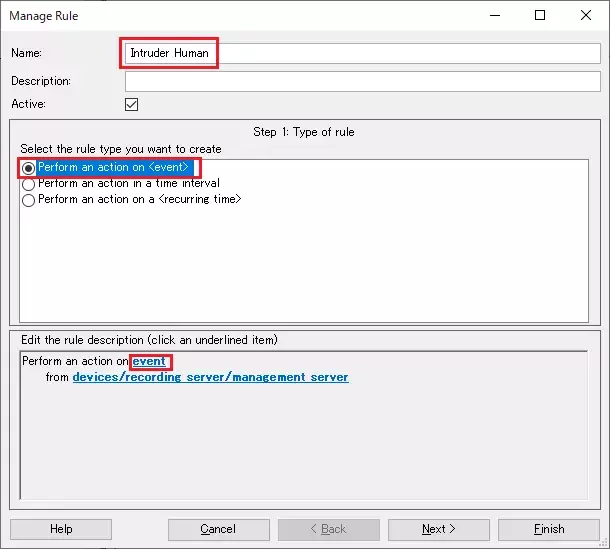
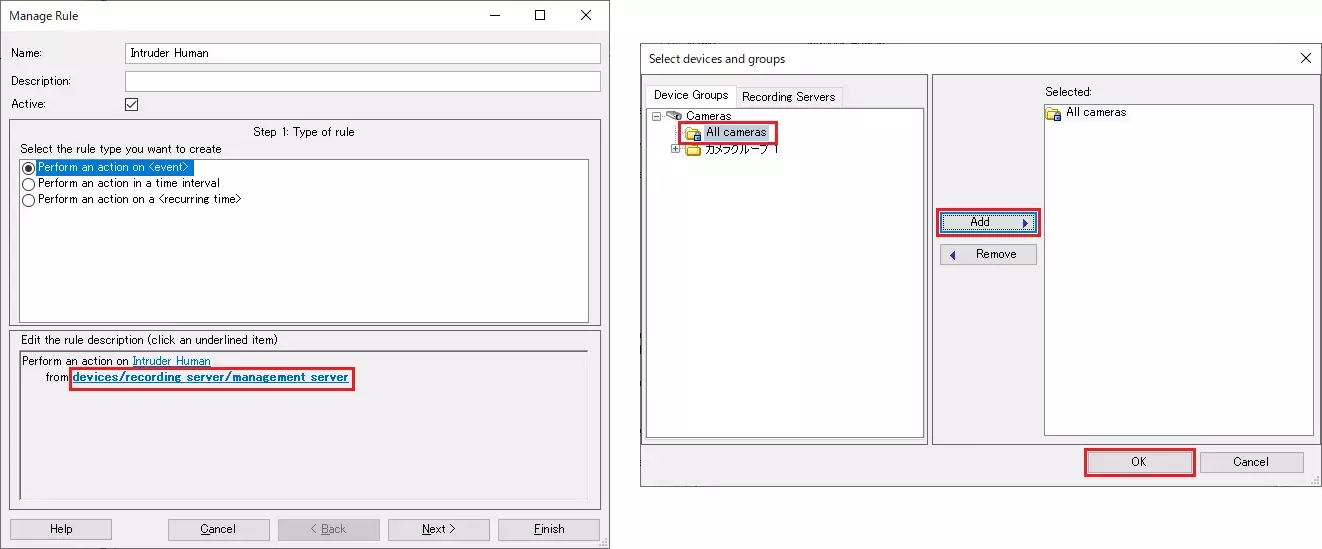
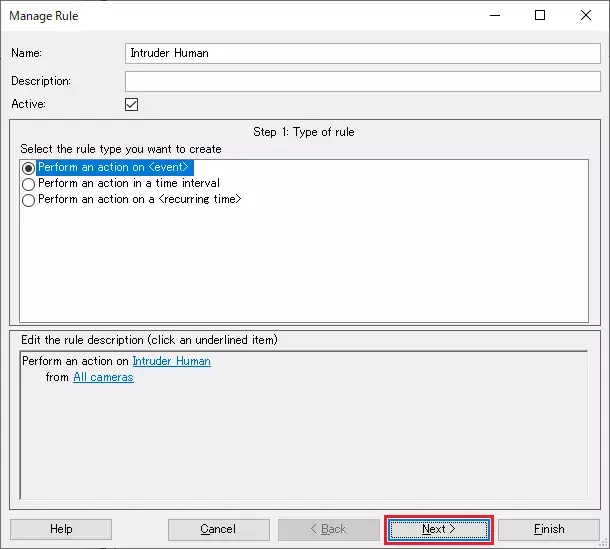
5. The [Manage Rule] screen will appear. Enter a [Name:] and select "Perform an action on <event>" in [Select the rule type you want to create].
Click "event" in [Edit the rule description].
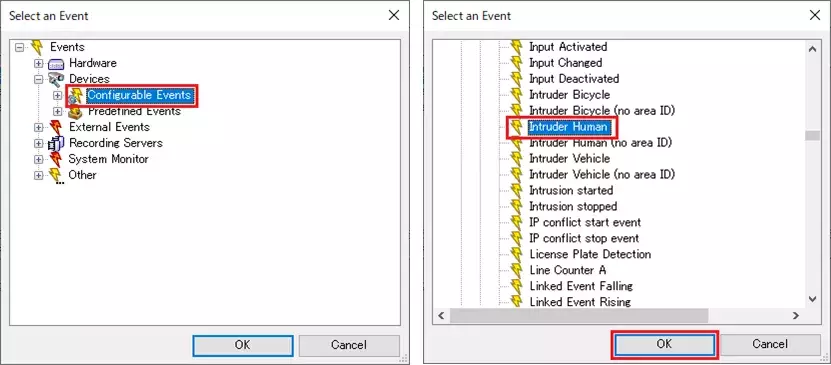
6. The [Select an Event] screen will appear. Select [Devices] - [Configurable Events] - [Intruder Human] and click the [OK] button.
8. Click the [Next] button.
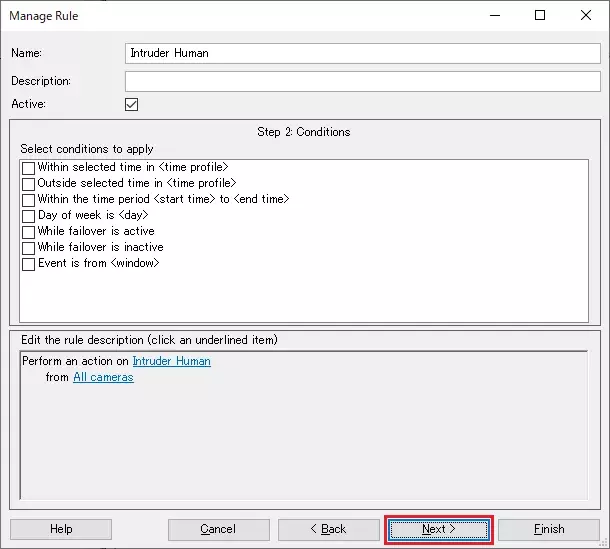
9. Click the [Next] button.
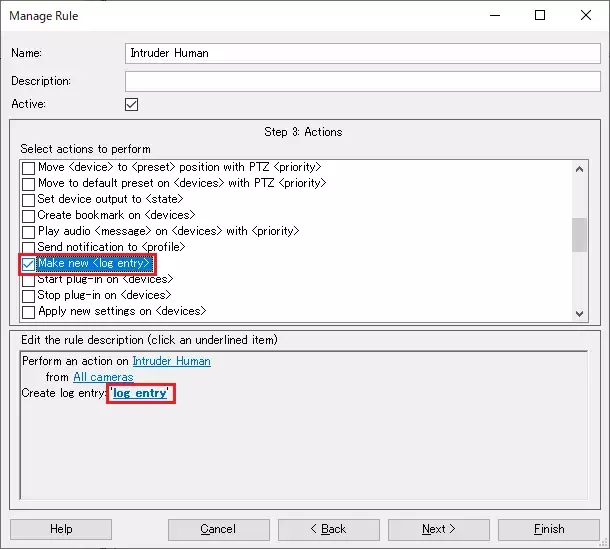
10. Select "Make new <log entry>" from [Select action to perform].
Left-click on "log entry" in [Edit the rule description].
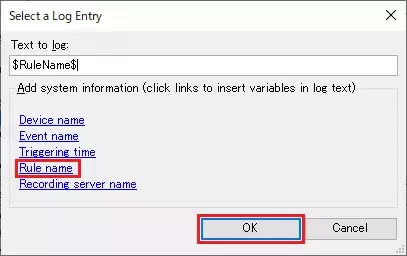
11. The [Select a Log Entry] screen will appear. Select "Rule name" and click the [OK] button.
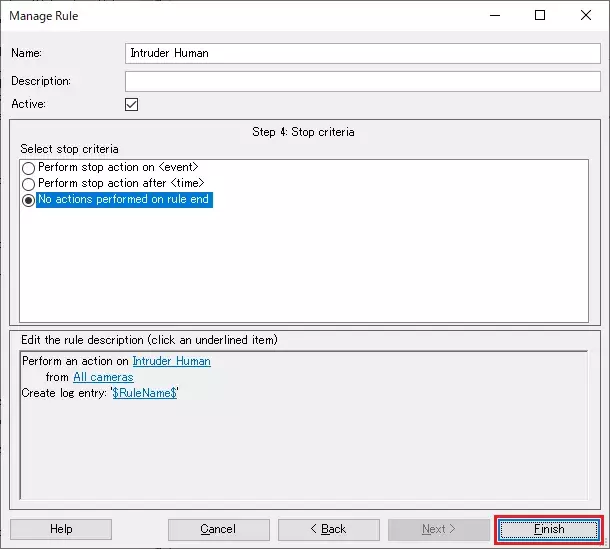
12. Click the [Next] button.
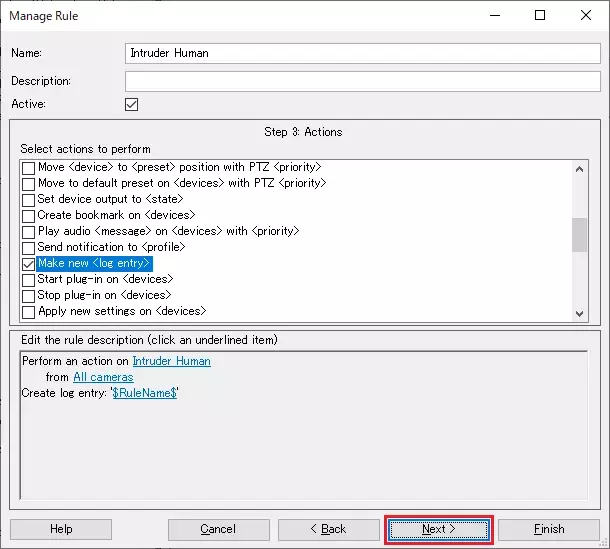
13. Click the [Finish] button.
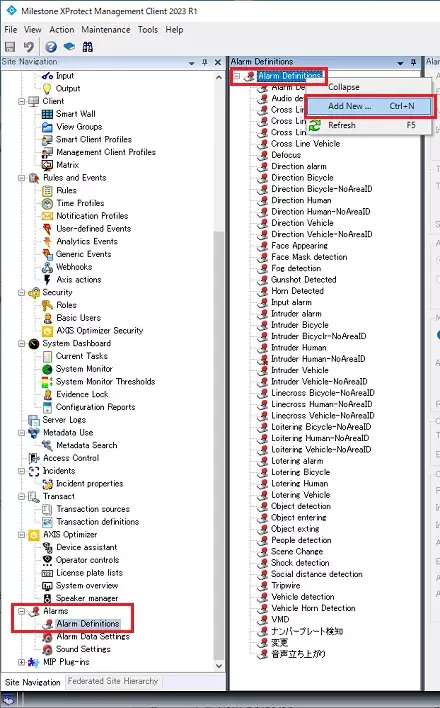
14. Click on [Alarm] - [Alarm Definitions] in the [Site Navigation] area.
Then right click on [Alarm Definitions] in the [Alarm Definitions] area and select [Add Rule...].
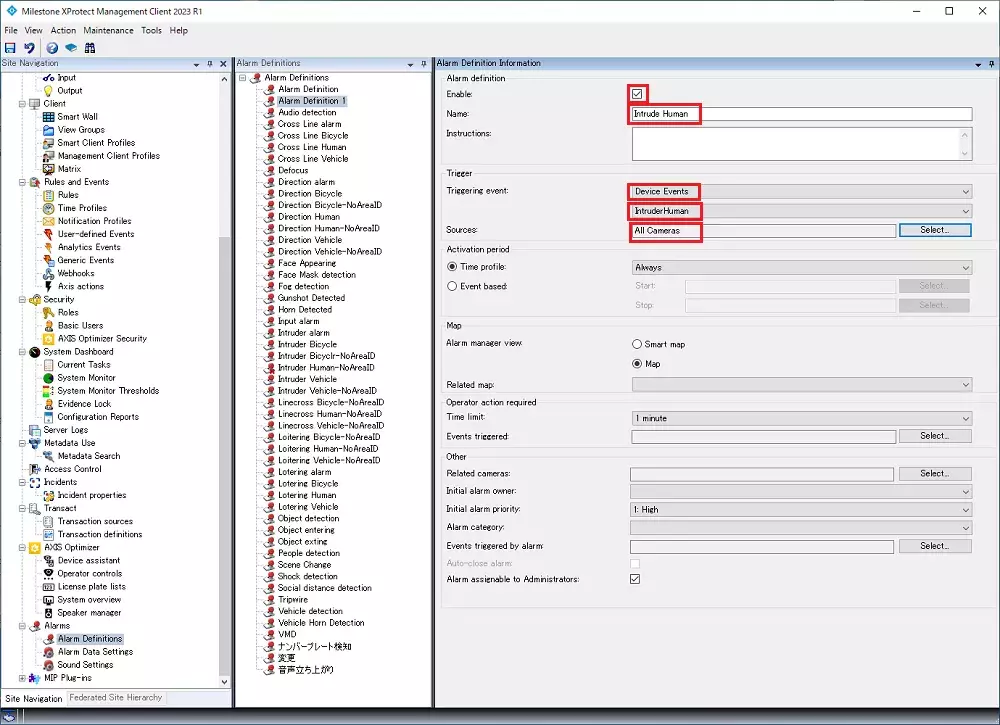
15. After configuring the settings, save them with [Save] at the top left of the screen.
Enable:Check the checkbox
Name:Enter the user defined name
Triggering event:(1st row):"Device event"
Triggering event:(2nd row):"Intruder Human"
This setting is shown in the "Message" column of the [Alarm Manager] screen in the [XProtect Smart Client].
Sources:"All Cameras" or "Select target camera"
<Confirmation of AI-VMD alarm reception in XProtect Smart Client>
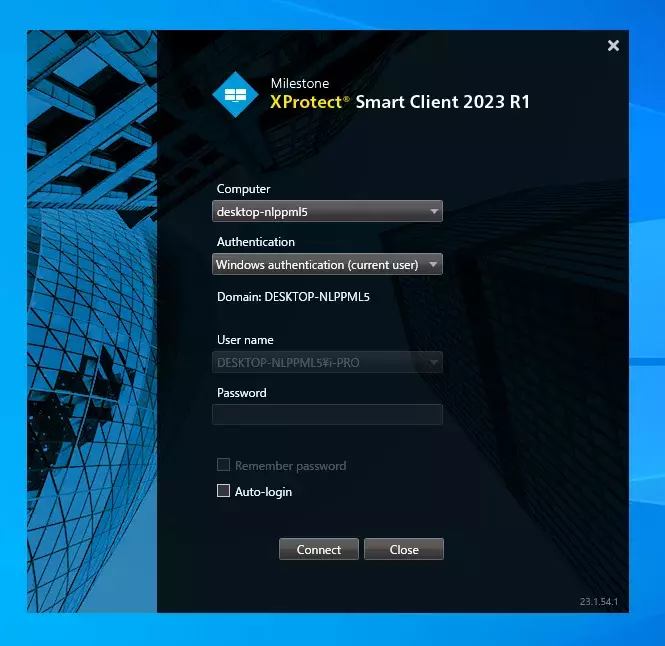
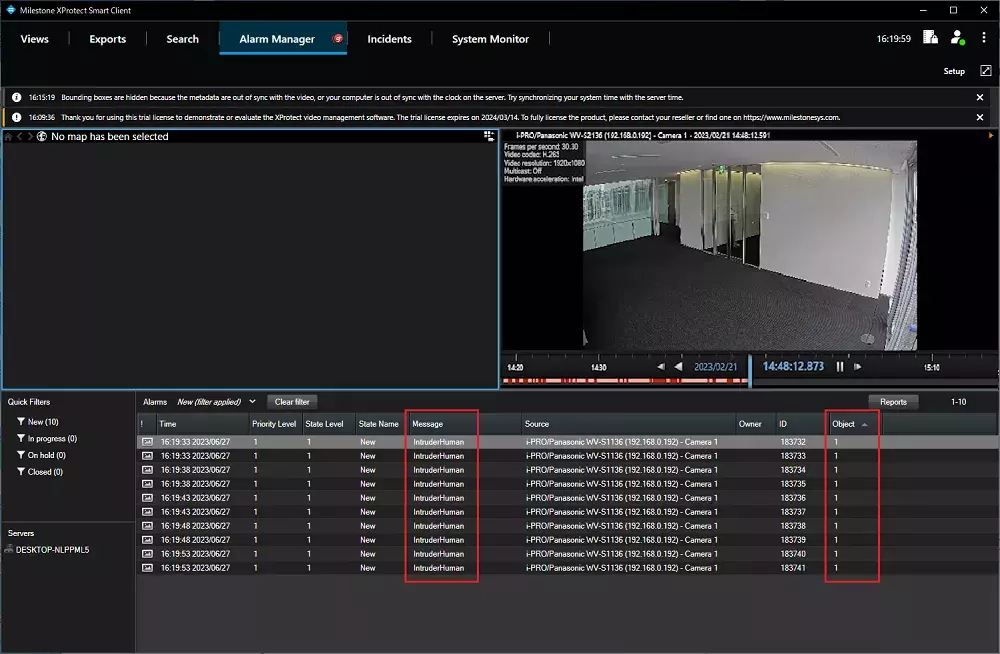
1. Start the [XProtect Smart Client] and click the [Connect] button
2. Click [Setup].
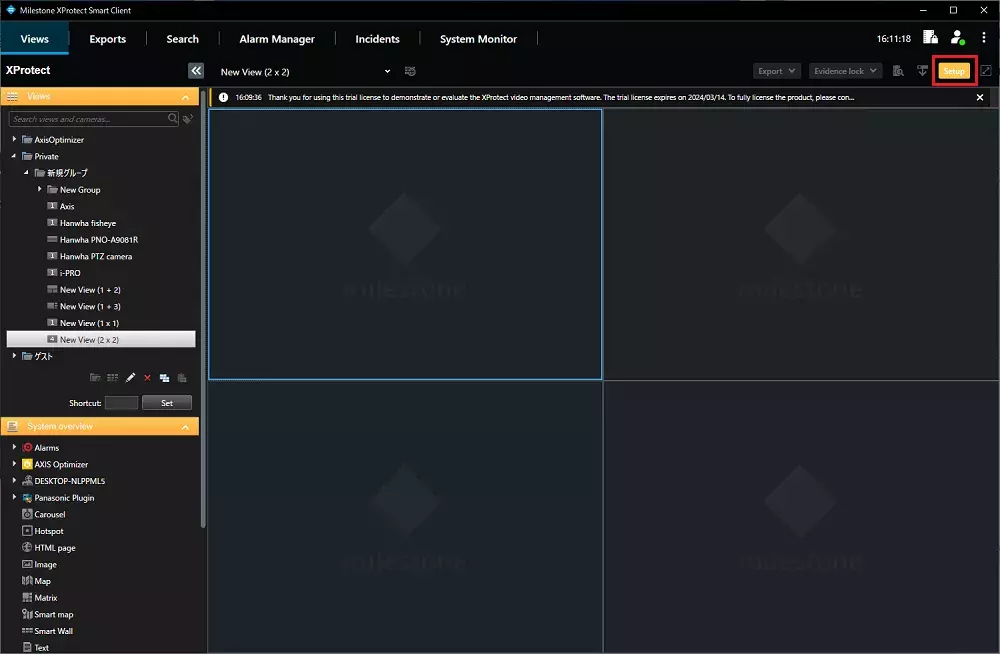
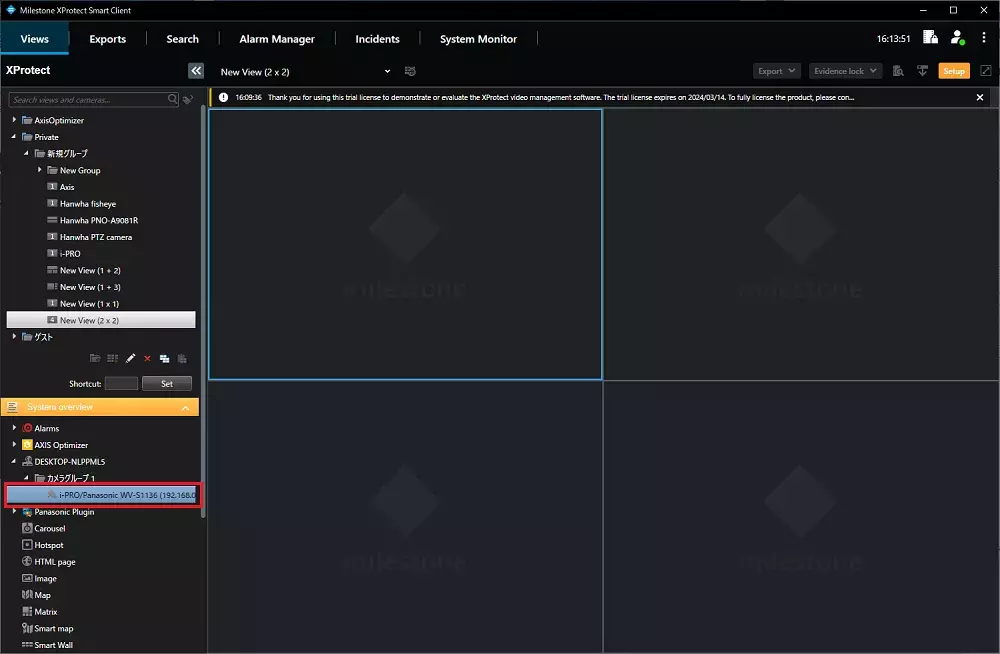
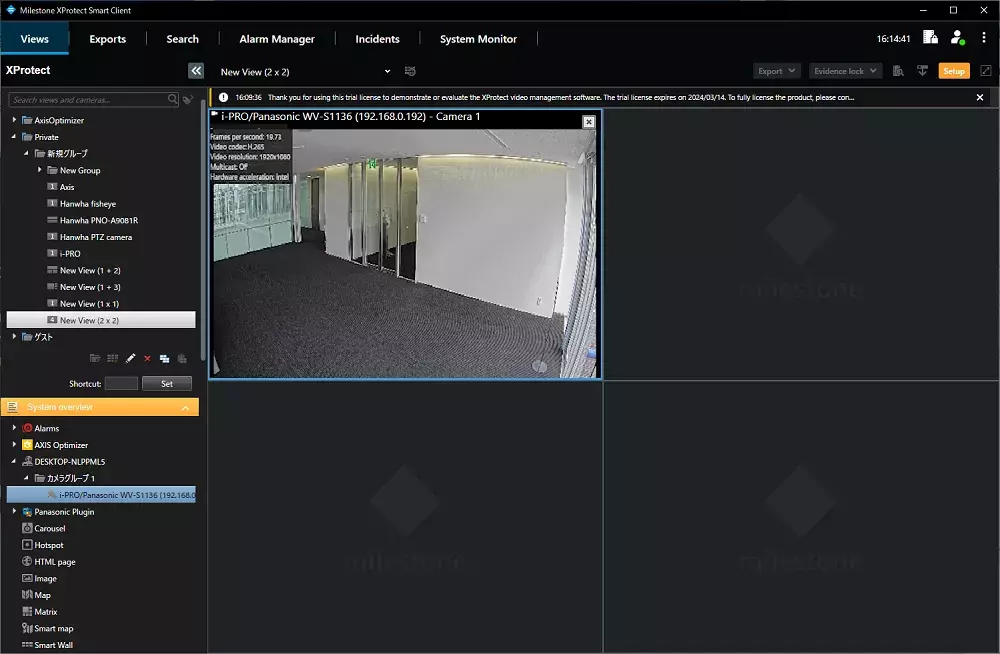
3. Select camera to view and drag it to a view area.
4. Click the [Alarm Manager] tab, and the alarm history will be displayed.
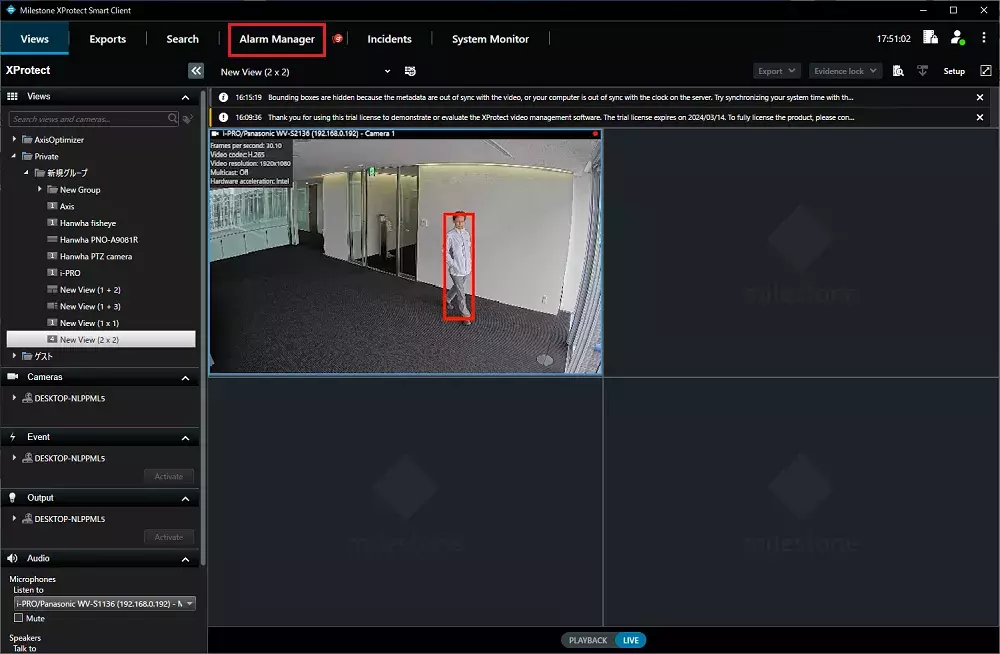
5. The intruder detection area number will be shown in the "Object" column.
The triggering event name that is set in Step 15 of <Alarm setup in Xprotect Management Client> will be shown in the "Message" column.
AI-VMD "How to add a stop event alarm"
Support for "Intrusion Stop" and "Loitering Detection Event Stop" has been starting from the following versions.
-
DP13.1 or later
-
AI-VMD (WV-XAE200W) version 3.50 or later
Please refer to the table below for the corresponding Stop events to the Start events.
| Start Event | Stop Event |
|---|---|
| Intruder Human | Inrusion Stopped |
| Intruder Vehicle | Inrusion Stopped |
| Intruder Bicycle | Inrusion Stopped |
| Loitering Human | Loitering detection event stopped |
| Loitering Vehicle | Loitering detection event stopped |
| Loitering Bicycle | Loitering detection event stopped |
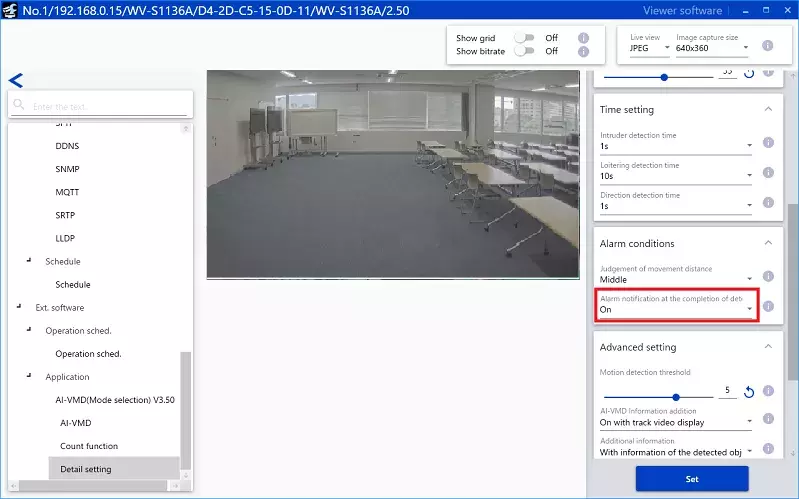
The setup procedure is the same as for regular AI-VMD, but please add the following settings to procedure for <Setup using "i-PRO Configuration Tool for Milestone">
AI-VMD Detailed settings
Select the [Extension Software] - [Applications], select [Detailed settings] for AI-VMD. Turn on "Alarm notification of the completion of detection". Once the settings are complete, please click the [Set] button.
Milestone XProtect Management Client 2023 R3 /DP 13.1
AI-VMD "Milestone Metadata Search Integration"
You can search for people, vehicles, and vehicle speed using [Search] feature in SmartClient.
This feature is supported by camera FW V2.40 or later.
Posting instructions for Milestone XProtect Management Client 2023 R2 / Device Pack 12.9a.
Vehicle speed search is supported at the following version.
- Camera firmware :V2.70 or later
- AI-VMD :V3.70 or later.
- XProtect :2024R2 /DP13.4a or later.
<AI-VMD configration>
To use the vehicle speed search, first update the AI-VMD. Then, in addition to configuring AI-VMD at the top of this page, set up the vehicle speed settings and the necessary options.
1. Install or update the latest version of AI-VMD.
2. Set up the Speed setting. For more details, refer to Section 3.5.5 "Speed Setting" on this page.
3.Ensure that the following option ("Give the ClassCandidate to Analytics Stream") is enabled for AI VMD. (Default: On)
This option is necessary for sending people and vehicle attributes effectively.

4.Change the camera setting by sending a CGI command to add speed information in the metadata that is sent from the camera to XProtect.
Example: When sending the request to a camera with the IP address 192.168.0.10:
http://192.168.0.10/cgi-bin/adam.cgi?methodName=setApplicationPreference&appName=iVmdApp&prefType=Integer&prefName=speed_metadata_type&value=1
<Metadata Setup in XProtect Management Client>
To enable the visibility of a search category or a filter in XProtect Smart Client, select the attribute on the Management Client.
1. Check "People" and "Vehicles" in [Server] - [Metadata Use] - [Metadata Search] - [Search Categories].
To use Vehicle Speed, check "Vehicle Speed".


<Metadata Search in Xprotect Smart Client>
1. Click the [Search] tab.

2. Select the search period.

3. Click [Select camera] and select the target camera.

4. Click [Search for...] and select "People" or "Vehicles" as the search category.
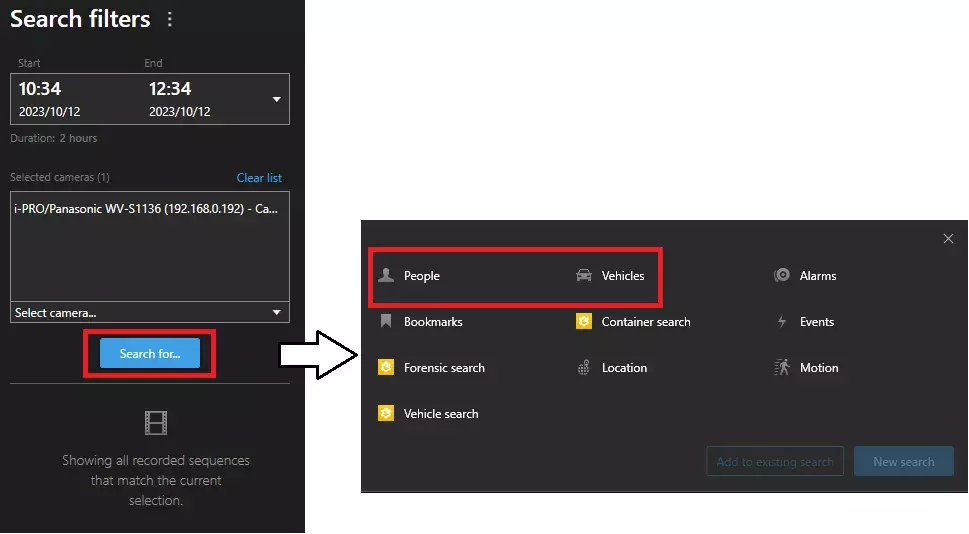
5. The search results are displayed.

6. To search for vehicle speed, set the vehicle speed search criteria.

7. The search results are displayed.

Milestone XProtect Management Client 2024 R1 /DP 13.4a